Showing posts with label windows. Show all posts

Wednesday, March 19, 2014

Windows 7 Upgrade Tricks and Traps

By: John Dow

I was bracing for the worst based on past rollouts from Microsoft. After experiencing the pain of Vista, I was quite apprehensive about the release of Windows 7. Even though there was good press (which I dont put a lot of faith in anyway) I knew there would be some serious bumps in the road to transition.

My first 4 or 5 installs went off without a hitch. Many of my customers were upgrading old Windows XP machines that were 6 years old. The new computers with Windows 7 had fast processors, more ram, and dedicated video cards, which helped a lot. The boot and shut down times were greatly reduced and the most popular software seemed to work right out of the box.

I didnt recommend upgrades to current equipment and most people went with the advice. Life was good and customers were happy. Since all of the installs were new computers and not Vista upgrades, none of the upgrade problems were an issue. There were quite a few problems found on the Vista upgrades, especially those who downloaded the Windows 7 install. The files wouldnt unpack properly, refused the new product keys, and had some rebooting problems. Then there were the unspecified errors and directory permissions problems. But all were confined to the upgrading Vista process, many due to reformatting the hard drive before the new install.

If you are upgrading a Vista machine, dont bother to reformat the hard drive before you upgrade. It appears that this is a problem. You should do a clean install and let Windows 7 format the hard drive in the process. That method appears to have few of the issues that the clean hard drive upgrades have and you still get a new clean system.

Then it happened, I found a nasty little problem on the new computers with Windows 7. Bringing in a new Windows 7 computer into an existing network worked fine as long as you stuck with the workgroup name of workgroup. But if you had a different name (which many clients do for multiple reasons), the Windows 7 computer was seen by the others in the workgroup but couldnt connect or see any of them.

I did a little research and talked to some other techs and they were experiencing the same problem. Not good, most clients didnt want to change their workgroup name. There was a work around by making every computer also a workgroup member and the original name. But it wasnt a great solution and might come back to haunt the client and me some day.
Another big issue with Windows 7 was the way it stored files. They went to a library system, which is a common method on the Macs and Linux machines. Once you get it, its probably a better method of organizing files. But when you introduce it to the user and a bunch of older Windows XP systems it can get confusing. When you change something as basic as how you view and store files, and you have a lot of shared files, users dont always adapt quickly.

Automated backup systems have to be changed around and tracking changed files gets a little more exciting but with a little training and automation you can over come the differences. Most users are over worked these days and some arent all that willing to change. So its both an operational and an attitude you get to deal with when bringing Windows 7 computers into an existing environment.

And, dont believe what you read about the Windows XP Mode. Many older computers arent compatible with the virtual machine methods used. About one in three of the computers Ive tried to set up XP mode couldnt do it for one reason or another. New machines often have all the necessary bios settings, chip sets, and other requirements but older computer may not. When it works, its great. But dont depend on it until you have tested it on the computer you want to run it.

Most of the other issues are basic configuration changes that default on a new Windows 7 install. For example the taskbar looks and acts different and many users are complaining they cant see whats open at a glance. There is a way to change the toolbar back to what it used to be by right clicking the toolbar and selecting properties. And make any changes in appearance you want.

All in all the Windows 7 transition and open issues are no where near what the Vista debacle was and most are easy to overcome. And if you dont like a particular feature or display method, most times you can change it back to what you want it to do or look like. The speed and faster boot times are more than worth the hassle of reconstructing your desktop like you want it.

Read more »

Tuesday, March 18, 2014

mPassport Seva Mobile App now available on Windows and Apple iOS platforms

mPassport Seva mobile app which was launched on Android platform is now available for both windows and iOS platforms. mPassport Seva Mobile App enables Indian Citizens to access Passport related information on their Smartphones. This application provides a wide variety of services such as status tracking, locating a Passport Office and other general information.

MPassport Seva android-app


The application provides information on various steps involved to obtain a passport related service and related phone numbers in case of queries or concerns. The users will be able to search for a Passport Seva Kendra (PSK) or District Passport Cell (DPC) in a district where a passport application can be submitted. This can also be searched based on PIN code. For certain States and Districts, the users can search for Police Stations as well.

Users can also track the status of their passport applications by providing File Number and Date of Birth. In case the passport has been dispatched, Delivery Status can also be tracked.
Read more »

Monday, March 17, 2014

How to restore the forgotten password on Windows 8

http://.blogspot.com


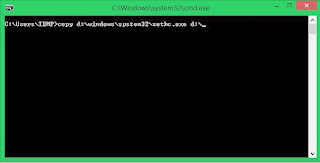
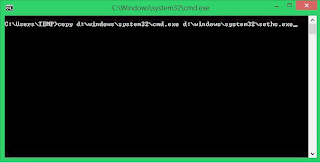
 The steps are as follows:

  1. Put Windows 8 Installation DVD into the last DVDRoom Boot
  2. Click the Repair 
  3. On the Menu Choose an Option click Troubleshoot 
  4. Click Advanced Options 
  5. Select the Command Prompt 
  6. Know first drive used windows, by default it will use drive c: but here I demonstrated when Windows is installed on drive D:  
  7. Type the following command

http://.blogspot.com
 
http://.blogspot.com


8.When finished we click Restart

 9. After restarting it will reappear Login Form .. We Press the Shift key five (5) times at the keyboard until the Command Prompt again

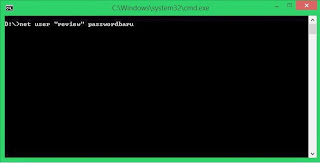
10. Type the command like this USERNAME PASSWORD Net User (username should be the same as the username that we want to use, and for the password it will be the username new password). For more details please see the picture below.


http://.blogspot.com

11. Please restart and enter the password that we created earlier

http://.blogspot.com
Read more »

Sunday, March 16, 2014

Speed Up the Windows XP Shutdown Time


Go to Start then select Run 

Type Regedit and click ok
 
Find HKEY_CURRENT_USERControl PanelDesktop
 
Select WaitToKillAppTimeout
 
Right click and select Modify
 
Change the value to 1000
 
Click OK
 
Now select HungAppTimeout
 
Right click and select Modify
 
Change the value to 1000
 
Click OK
 
 
Now find HKEY_USERS.DEFAULTControl PanelDesktop
 
Select WaitToKillAppTimeout
 
Right click and select Modify
 
Change the value to 1000
 
Click OK
 

Now find HKEY_LOCAL_MACHINESystemCurrentControlSetControl
 
Select WaitToKillServiceTimeout
 
Right click and select Modify
 
Change the value to 1000
 
Click OK
Read more »

Wednesday, March 12, 2014

How To Disable Startup programs In Windows 7

pc trick disable startup programsStartup programs will automatically starts whenever you start up your PC. There are many unnecessary programs which takes so much memory and you rarely use that (slowdown your pc). By disabling startup programs unnecessary your PC performance will improve much better than before. For some example of startup programs like yahoo messenger, MSN messenger, Skye, utorrent, AOL messenger and other programs


If You Need To Disable Your Unnecessary Start Up Programs To
                Speedup Your pc Follow This Easy Steps

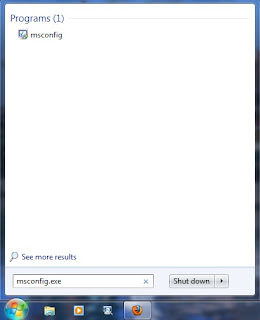
  1. Click on start button of you pc
  2. Type msconfig in the search box "For xp user type msconfig on run"

pc tips disable startup programs


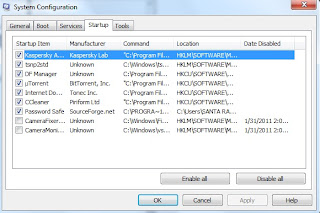
     3. Click on msconfig then after opened system configuration dialog box go to startup tab


     4. Unchecked unnecessary startup programs that you want to disable. If you found any program that
         you are not sure then just leave it enabled for just safe.

     5. Then click on apply and ok. After you disable your startup programs it wont run from you next
          reboot.


Read more »

Reasons To Switch To Android From Windows Phone

Recently I wrote an article about how Apple can "steal" a few customers from Android.Well,that will be a bit too harsh upon Android,I think.But don;t worry apple fans I am not gonna post the opposite. Obviously,because i think its almost impossible to detach Apple fans from Iphone.So I am gonna post reasons to switch to Android from Windows Phone.

1.Customisation

              One of the things about Windows Phone is that it’s designed not to require heavy tweaking like the old Windows Mobile did. Instead, its customizations are designed to be more automated and content-based.  For example instead of you having to go in and change a background image for a hub or live tile, things change automatically based on what’s going on.  A lot of people still really like all of the power to dig under the hood and change things that other people probably wouldn’t have the time or desire to get into.  This is another big reason why many of the old Windows Mobile users, who loved all the customizations they could do, have switched to Android which offers a similarly high level of manual customization options.  Of course, you don’t have to tweak everything in Android, but then you might get bored with it pretty quickly.

2.More Apps

              This is the gold standard complaint for new operating systems and it’s an especially prevalent mantra for Windows Phone even though in reality Windows Phone may very well support all of the apps you want.  Of course there are instances where it does not, and for those you’ll probably have to switch to a different platform like Android.

3.More Features

           
                                 Android has a lot more “innovative” yet perhaps not so useful features.  If you want to be on the cutting edge of experimental stuff, Android is what you need.  The whole 3D screens and cameras thing didn’t exactly catch on, but Android certainly had it.  Maybe you think it’s cool to move icons around on your screen, by holding your finger on one and then turning your whole body to the left or right.  Maybe you want to launch the camera by turning on your phone, holding a finger on the screen, then holding the phone up vertically and rotating it.  Or maybe you think pressing a button to make a call is for suckers and would rather just hold the phone up to your head to start a call.  There’s so many more of these strange new features coming to Android, where as Windows Phone still keeps things pretty simple and doesn’t add something unless it’s a little more thought-out first.
Windows Phone 7.5 Mango vs. Android 2.3.2 Gingerbread

4.Maturity

                 Well,everyone needs to admit that WP is still quite young,whereas Android is the elder brother.The project butter in Android has made things smoother and faster.So obviously,if you want an OS with experience,Android is your choice.
Enhanced by Zemanta
Read more »

How to Solve Application Problems That Could Not Be Opened in Windows 8

http://.blogspot.com

Step-by-Step as follows:

1. Run (Win + R)
2. Type secpol.msc and press [Enter]
3. Double-click on Local Policies subsequent double-click on the Security Options and look for the option "User Account Control: Run all administrators in Admin approval mode"

http://.blogspot.com

4. select disable
5. Reboot the computer.
6. Good luck
Read more »

Monday, March 10, 2014

WINDOWS SHORTCUT

Run Commands:


Quote:
compmgmt.msc - Computer management
devmgmt.msc - Device manager
diskmgmt.msc - Disk management
dfrg.msc - Disk defrag
eventvwr.msc - Event viewer
fsmgmt.msc - Shared folders
gpedit.msc - Group policies
lusrmgr.msc - Local users and groups
perfmon.msc - Performance monitor
rsop.msc - Resultant set of policies
secpol.msc - Local security settings
services.msc - Various Services
msconfig - System Configuration Utility
regedit - Registry Editor
msinfo32 _ System Information
sysedit _ System Edit
win.ini _ windows loading information(also system.ini)
winver _ Shows current version of windows
mailto: _ Opens default email client
command _ Opens command prompt

Run Commands to access the control panel:


Quote:
Add/Remove Programs control appwiz.cpl
Date/Time Properties control timedate.cpl
Display Properties control desk.cpl
FindFast control findfast.cpl
Fonts Folder control fonts
Internet Properties control inetcpl.cpl
Keyboard Properties control main.cpl keyboard
Mouse Properties control main.cpl
Multimedia Properties control mmsys.cpl
Network Properties control netcpl.cpl
Password Properties control password.cpl
Printers Folder control printers
Sound Properties control mmsys.cpl sounds
System Properties control sysdm.cpl


Command Prompt:


Quote:
ANSI.SYS Defines functions that change display graphics, control cursor movement, and reassign keys.
APPEND Causes MS-DOS to look in other directories when editing a file or running a command.
ARP Displays, adds, and removes arp information from network devices.
ASSIGN Assign a drive letter to an alternate letter.
ASSOC View the file associations.
AT Schedule a time to execute commands or programs.
ATMADM Lists connections and addresses seen by Windows ATM call manager.
ATTRIB Display and change file attributes.
BATCH Recovery console command that executes a series of commands in a file.
BOOTCFG Recovery console command that allows a user to view, modify, and rebuild the boot.ini
BREAK Enable / disable CTRL + C feature.
CACLS View and modify file ACLs.
CALL Calls a batch file from another batch file.
CD Changes directories.
CHCP Supplement the International keyboard and character set information.
CHDIR Changes directories.
CHKDSK Check the hard disk drive running FAT for errors.
CHKNTFS Check the hard disk drive running NTFS for errors.
CHOICE Specify a listing of multiple options within a batch file.
CLS Clears the screen.
CMD Opens the command interpreter.
COLOR Easily change the foreground and background color of the MS-DOS window.
COMP Compares files.
COMPACT Compresses and uncompress files.
CONTROL Open control panel icons from the MS-DOS prompt.
CONVERT Convert FAT to NTFS.
COPY Copy one or more files to an alternate location.
CTTY Change the computers input/output devices.
DATE View or change the systems date.
DEBUG Debug utility to create assembly programs to modify hardware settings.
DEFRAG Re-arrange the hard disk drive to help with loading programs.
DEL Deletes one or more files.
DELETE Recovery console command that deletes a file.
DELTREE Deletes one or more files and/or directories.
DIR List the contents of one or more directory.
DISABLE Recovery console command that disables Windows system services or drivers.
DISKCOMP Compare a disk with another disk.
DISKCOPY Copy the contents of one disk and place them on another disk.
DOSKEY Command to view and execute commands that have been run in the past.
DOSSHELL A GUI to help with early MS-DOS users.
DRIVPARM Enables overwrite of original device drivers.
ECHO Displays messages and enables and disables echo.
EDIT View and edit files.
EDLIN View and edit files.
EMM386 Load extended Memory Manager.
ENABLE Recovery console command to enable a disable service or driver.
ENDLOCAL Stops the localization of the environment changes enabled by the setlocal command.
ERASE Erase files from computer.
EXIT Exit from the command interpreter.
EXPAND Expand a M*cros*ft Windows file back to its original format.
EXTRACT Extract files from the M*cros*ft Windows cabinets.
FASTHELP Displays a listing of MS-DOS commands and information about them.
FC Compare files.
FDISK Utility used to create partitions on the hard disk drive.
FIND Search for text within a file.
FINDSTR Searches for a string of text within a file.
FIXBOOT Writes a new boot sector.
FIXMBR Writes a new boot record to a disk drive.
FOR Boolean used in batch files.
FORMAT Command to erase and prepare a disk drive.
FTP Command to connect and operate on a FTP server.
FTYPE Displays or modifies file types used in file extension associations.
GOTO Moves a batch file to a specific label or location.
GRAFTABL Show extended characters in graphics mode.
HELP Display a listing of commands and brief explanation.
IF Allows for batch files to perform conditional processing.
IFSHLP.SYS 32-bit file manager.
IPCONFIG Network command to view network adapter settings and assigned values.
KEYB Change layout of keyboard.
LABEL Change the label of a disk drive.
LH Load a device driver in to high memory.
LISTSVC Recovery console command that displays the services and drivers.
LOADFIX Load a program above the first 64k.
LOADHIGH Load a device driver in to high memory.
LOCK Lock the hard disk drive.
LOGON Recovery console command to list installations and enable administrator login.
MAP Displays the device name of a drive.
MD Command to create a new directory.
MEM Display memory on system.
MKDIR Command to create a new directory.
MODE Modify the port or display settings.
MORE Display one page at a time.
MOVE Move one or more files from one directory to another directory.
MSAV Early M*cros*ft Virus scanner.
MSD Diagnostics utility.
MSCDEX Utility used to load and provide access to the CD-ROM.
NBTSTAT Displays protocol statistics and current TCP/IP connections using NBT
NET Update, fix, or view the network or network settings
NETSH Configure dynamic and static network information from MS-DOS.
NETSTAT Display the TCP/IP network protocol statistics and information.
NLSFUNC Load country specific information.
NSLOOKUP Look up an IP address of a domain or host on a network.
PATH View and modify the computers path location.
PATHPING View and locate locations of network latency.
PAUSE Command used in batch files to stop the processing of a command.
PING Test / send information to another network computer or network device.
POPD Changes to the directory or network path stored by the pushd command.
POWER Conserve power with computer portables.
PRINT Prints data to a printer port.
PROMPT View and change the MS-DOS prompt.
PUSHD Stores a directory or network path in memory so it can be returned to at any time.
QBASIC Open the QBasic.
RD Removes an empty directory.
REN Renames a file or directory.
RENAME Renames a file or directory.
RMDIR Removes an empty directory.
ROUTE View and configure windows network route tables.
RUNAS Enables a user to execute a program on another computer.
SCANDISK Run the scandisk utility.
SCANREG Scan registry and recover registry from errors.
SET Change one variable or string to another.
SETLOCAL Enables local environments to be changed without affecting anything else.
SETVER Change MS-DOS version to trick older MS-DOS programs.
SHARE Installs support for file sharing and locking capabilities.
SHIFT Changes the position of replaceable parameters in a batch program.
SHUTDOWN Shutdown the computer from the MS-DOS prompt.
SMARTDRV Create a disk cache in conventional memory or extended memory.
SORT Sorts the input and displays the output to the screen.
START Start a separate window in Windows from the MS-DOS prompt.
SUBST Substitute a folder on your computer for another drive letter.
SWITCHES Remove add functions from MS-DOS.
SYS Transfer system files to disk drive.
TELNET Telnet to another computer / device from the prompt.
TIME View or modify the system time.
TITLE Change the title of their MS-DOS window.
TRACERT Visually view a network packets route across a network.
TREE View a visual tree of the hard disk drive.
TYPE Display the contents of a file.
UNDELETE Undelete a file that has been deleted.
UNFORMAT Unformat a hard disk drive.
UNLOCK Unlock a disk drive.
VER Display the version information.
VERIFY Enables or disables the feature to determine if files have been written properly.
VOL Displays the volume information about the designated drive.
XCOPY Copy multiple files, directories, and/or drives from one location to another.
TRUENAME When placed before a file, will display the whole directory in which it exists
TASKKILL It allows you to kill those unneeded or locked up applications


Windows XP Shortcuts:


Quote:
ALT+- (ALT+hyphen) Displays the Multiple Document Interface (MDI) child windows System menu
ALT+ENTER View properties for the selected item
ALT+ESC Cycle through items in the order they were opened
ALT+F4 Close the active item, or quit the active program
ALT+SPACEBAR Display the System menu for the active window
ALT+TAB Switch between open items
ALT+Underlined letter Display the corresponding menu
BACKSPACE View the folder one level up in My Computer or Windows Explorer
CTRL+A Select all
CTRL+B Bold
CTRL+C Copy
CTRL+I Italics
CTRL+O Open an item
CTRL+U Underline
CTRL+V Paste
CTRL+X Cut
CTRL+Z Undo
CTRL+F4 Close the active document
CTRL while dragging Copy selected item
CTRL+SHIFT while dragging Create shortcut to selected iteM
CTRL+RIGHT ARROW Move the insertion point to the beginning of the next word
CTRL+LEFT ARROW Move the insertion point to the beginning of the previous word
CTRL+DOWN ARROW Move the insertion point to the beginning of the next paragraph
CTRL+UP ARROW Move the insertion point to the beginning of the previous paragraph
SHIFT+DELETE Delete selected item permanently without placing the item in the Recycle Bin
ESC Cancel the current task
F1 Displays Help
F2 Rename selected item
F3 Search for a file or folder
F4 Display the Address bar list in My Computer or Windows Explorer
F5 Refresh the active window
F6 Cycle through screen elements in a window or on the desktop
F10 Activate the menu bar in the active program
SHIFT+F10 Display the shortcut menu for the selected item
CTRL+ESC Display the Start menu
SHIFT+CTRL+ESC Launches Task Manager
SHIFT when you insert a CD Prevent the CD from automatically playing
WIN Display or hide the Start menu
WIN+BREAK Display the System Properties dialog box
WIN+D Minimizes all Windows and shows the Desktop
WIN+E Open Windows Explorer
WIN+F Search for a file or folder
WIN+F+CTRL Search for computers
WIN+L Locks the desktop
WIN+M Minimize or restore all windows
WIN+R Open the Run dialog box
WIN+TAB Switch between open items


Windows Explorer Shortcuts:


Quote:
ALT+SPACEBAR - Display the current window’s system menu
SHIFT+F10 - Display the items context menu
CTRL+ESC - Display the Start menu
ALT+TAB - Switch to the window you last used
ALT+F4 - Close the current window or quit
CTRL+A - Select all items
CTRL+X - Cut selected item(s)
CTRL+C - Copy selected item(s)
CTRL+V - Paste item(s)
CTRL+Z - Undo last action
CTRL+(+) - Automatically resize the columns in the right hand pane
TAB - Move forward through options
ALT+RIGHT ARROW - Move forward to a previous view
ALT+LEFT ARROW - Move backward to a previous view
SHIFT+DELETE - Delete an item immediately
BACKSPACE - View the folder one level up
ALT+ENTER - View an item’s properties
F10 - Activate the menu bar in programs
F6 - Switch between left and right panes
F5 - Refresh window contents
F3 - Display Find application
F2 - Rename selected item


Internet Explorer Shortcuts:


Quote:
CTRL+A - Select all items on the current page
CTRL+D - Add the current page to your Favorites
CTRL+E - Open the Search bar
CTRL+F - Find on this page
CTRL+H - Open the History bar
CTRL+I - Open the Favorites bar
CTRL+N - Open a new window
CTRL+O - Go to a new location
CTRL+P - Print the current page or active frame
CTRL+S - Save the current page
CTRL+W - Close current browser window
CTRL+ENTER - Adds the http://www. (url) .com
SHIFT+CLICK - Open link in new window
BACKSPACE - Go to the previous page
ALT+HOME - Go to your Home page
HOME - Move to the beginning of a document
TAB - Move forward through items on a page
END - Move to the end of a document
ESC - Stop downloading a page
F11 - Toggle full-screen view
F5 - Refresh the current page
F4 - Display list of typed addresses
F6 - Change Address bar and page focus
ALT+RIGHT ARROW - Go to the next page
SHIFT+CTRL+TAB - Move back between frames
SHIFT+F10 - Display a shortcut menu for a link
SHIFT+TAB - Move back through the items on a page
CTRL+TAB - Move forward between frames
CTRL+C - Copy selected items to the clipboard
CTRL+V - Insert contents of the clipboard
ENTER - Activate a selected link
HOME - Move to the beginning of a document
END - Move to the end of a document
F1 - Display Internet Explorer Help
Read more »

Saturday, March 8, 2014

How to Stop Grouping of Taskbar Buttons in Windows 8

Reminding of old days, in Windows XP we had the expanded taskbar icons for currently running programs. Since Windows 7, these taskbar buttons are grouped by default to the program icon in order to increase free space on taskbar. But, some of users may find it uninteresting and they may like to restore the ungrouped program buttons.

Let’s see the differences between past and present conditions:

3 Ways To Expanded Taskbar Buttons In Windows 8 How to Stop Grouping of Taskbar Buttons in Windows 8

From the above image, I guess you’ve figured out what I’m trying to do. The reason behind broking the combination and split them to separate tab is to enhance the efficiency. In the past condition, you can read what’s going on the tab since it is mentioned there but in the present scenario, you have to move the cursor to get the same thing.

Now, in this article, we’ll provide you with three ways to configure these settings and increase the productivity of your Windows 8.

Method 1: Manually Using Taskbar Properties


1. Right click on taskbar and select Properties.

3 Ways To Expanded Taskbar Buttons In Windows 8 1 How to Stop Grouping of Taskbar Buttons in Windows 8

2. In the Taskbar Properties window, for the Taskbar buttons section, click the drop down menu and select Never combine.

3 Ways To Expanded Taskbar Buttons In Windows 8 2 How to Stop Grouping of Taskbar Buttons in Windows 8

Click Apply then OK. Reboot the machine to get results. So this was the basic way, now lets see some advance ways:

Method 2: Using Registry Editor


1. Press Windows Key + R and put regedit in Run dialog box, click OK to open Registry Editor.

REGEDIT How to Stop Grouping of Taskbar Buttons in Windows 8

2. Navigate here:
HKEY_CURRENT_USERSoftwareMicrosoftWindowsCurrentVersionExplorerAdvanced

3 Ways To Expanded Taskbar Buttons In Windows 8 3 How to Stop Grouping of Taskbar Buttons in Windows 8

3. In the right pane of this location, create a new DWORD using Right click -> New -> DWORD Value. Name it as TaskbarGlomLevel. Double click to modify it:

3 Ways To Expanded Taskbar Buttons In Windows 8 4 How to Stop Grouping of Taskbar Buttons in Windows 8

4. Put the Value data to 1 to have not combined tabs until taskbar is full, otherwise put 2 to have no grouping at all. Click OK. Restart the computer to see effects. If you want to group tabs again in the future, simply put 0 as Value data or delete the DWORD created in step 3.

Method 3: Using Command Prompt / Batch File

To simply the work, you can use the following .bat (command processing) file. Extract the RAR file and simply right click on the file after download and select Run as administrator:
Download: Batch File to Disable Grouping Taskbar on Windows 8
Hope you find the tip useful!
Read more »

Windows Explorer Error Common Causes Simple Fixes

By: Logan Albright

Have you ever been using the computer, just surfing the net or playing around with a Windows based software, and suddenly you get the message that ‘Windows Explorer has encountered an error’ - which follows the entire desktop crashing, a little hour glass appearing and then the entire desktop, flushed with all your icons; reappearing again. The problem is, whatever you were doing has been erased and if you were doing some work with any of the office tools and did not save them, then you can wave them goodbye. This article will tell you how you can avoid all that, by exploring the common causes and simple fixes you can do to prevent Windows Explorer error.

Windows Explorer errors and crashes are pretty common nowadays, especially with the newer incarnations of Windows, and there are some easy ways you can adopt to avoid them completely. One, is to maintain the health of your computer and its internal physical memory. Some of these problems have been traced to an overly fragmented drive, which means that data and important files have been scattered all over the disk - requiring Windows to constantly re fragment data. This also causes hiccups within the system and can cause Windows Explorer to crash at the same time. Avoid this by using the defragment tool that is present on your system.

Leave it on over night if you have a particularly large hard disk and soon in the morning, you will be presented with a faster and much more efficient machine. Also, take a look at the programs you have installed, especially those that are running in the background. More than 60% of computer uses have no idea about the damage they are doing to their system by having unnecessary programs running in the task bar, eating away at precious system memory. Delete those that you do not need and ensure that those that are running need to be running. If there are non essential, then quit the program at once and ensure that it does not load up at start up again.

One more common root of Windows Explorer crashes is the registry itself. This tiny file that sits within the core system of Windows is one of the most important files in the OS. Windows uses it as a digital log book as well as an instruction guide to run programs. Once malware, viruses and over use set in, orphan keys, bad command lines and even corrupted data become a familiar sight in registry files. These corrupted and messed up files are the cause of explorer errors and crashes. Get a decent registry cleaner online and start cleaning your registry regularly. The process is extremely fast and it ensures the overall health of your registry - which means the overall health of your entire system. Once you are able to ensure the health of your registry, then these niggling problems in Windows Explorer will surely disappear, along with the common causes. It is a simple fix, and together with the rest discussed, will ensure that your computer will run smoothly all the time.

Read more »

Friday, March 7, 2014

Blackberry Desktop Software On Windows 8


 If you are going to upgrade to windows 8, you may be wondering whether or not your BlackBerry Desktop Software will work. As noted by RIM in their BlackBerry knowledge base, everything will go fine provided you follow some initial steps.
Windows 8
BlackBerry Desktop Software will function when installed on Microsoft Windows 8 however .NET Framework 3.5 must be installed and enabled prior to the install of the BlackBerry Desktop Software. Microsoft .NET 3.5 framework can be installed and enabled by following the instructions in the Microsoft article listed below.

http://msdn.microsoft.com/en-us/library/hh506443.aspx

In addition, RIM also notes that an updated version of the BlackBerry Desktop Software is coming that will have enhanced features specifically for Windows 8 users.
Read more »

How to Add or change language in Windows 8

http://.blogspot.com


The steps are as follows:

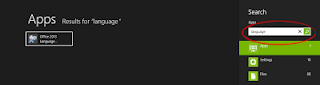
1. Go to the search box by pressing WIN + Q at the same time, then type in "Language" in the search box
http://.blogspot.com


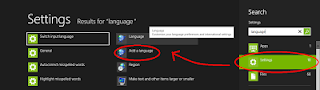
2. Then select the option "Settings" on the search results and select "Add Language"
http://.blogspot.com


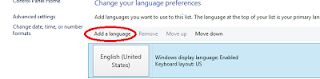
3.The new jendel it will appear as shown below, then click "Add Language"


http://.blogspot.com


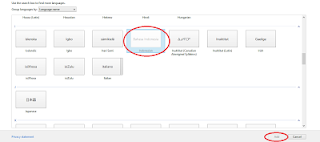
4. Next will come a list of the worlds languages, in this case we select "Indonesian" Then click "Add"

http://.blogspot.com
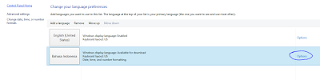
5. Then click on "Options" 

http://.blogspot.com


 6. Then click "Download and Install Language Pack"

http://.blogspot.com

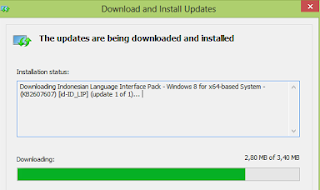
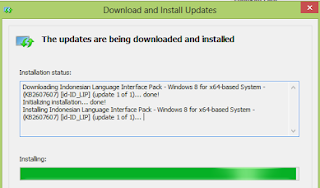
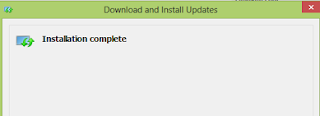
  7. Furthermore, the download window and install the update and wait for it to finish 

http://.blogspot.com


http://.blogspot.com


  8. After the installation process is finished the next will appear as below, then click the "Close"

http://.blogspot.com


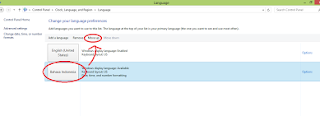
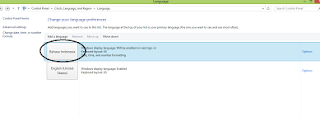
 9. Furthermore Indonesian positioned above by clicking "Move Up"


http://.blogspot.com
 10. Ensure Indonesian lies above

http://.blogspot.com
11. Then restart your computer / laptop

12. Good luck
Read more »

Thursday, March 6, 2014

Tricks For Windows 8


Using Windows 8 is rather Difficult...
Try these.. Some of the primary techniques which could be helpful...!!!

Windows 8 is finally here, and if youre used to past editions of Windows then youre going to notice that quite a bit has changed. In fact, Windows has seen the biggest changes since the leap from Windows 3.1 to Windows 95.

Some Windows 8 tricks


Out goes the Begin selection, in comes the new touch-oriented Begin display, new programs, new customer interface conferences - even experienced PC users may be remaining feeling a little lost.
Dont hopelessness, though, help is at part with the following Windows 8 guide. Weve been analyzing every aspect of Windows 8, discovering many of its most important tips and techniques, so read our guide and youll soon be equipped to get the most out of Windows latest release.

1. Lock screen
Windows 8 reveals on its lock display, which looks pretty but unfortunately shows no signs about what to do next.Its all very uncomplicated, though. Just tap the space bar, rotate the rabbit rim or run up-wards on a touchscreen display screen technology to expose a frequent sign in display with the customer name you created during installation. Get into your password to begin.

2. Basic navigation
Windows 8 releases with its new customer interface, all vibrant flooring and touch-friendly programs. And if youre using a tablet then itll all be very straightforward: just run remaining or right to look for the display, and tap any floor of interest.
On a frequent pc, though, you might on the other hand rotate the rabbit rim to look for forward and backward.
And you can also use the laptop key pad. Media the Home or End important factors to leap from one end of your Begin display to the other, for example, then use the suggestion important factors to decide on a particular floor, hitting Get into to select it. Media the Windows key to come back to the Begin screen; right-click (or run down on) programs you dont need and select Unpin to remove them; and move and fall the other flooring around to arrange them as you like.

3. App groups
The Begin display programs are initially shown in a fairly unique order, but if youd prefer a more organized life then its simple to sort them into custom categories.
You might move Individuals, Mail, Messaging and Calendar over to the left-hand part, for example, to form a separate People team. Simply select the minus symbol in the end right area of the display to zoom capability out and youll now discover you can move and fall the new team (or any of the others) around as a prevent.
Right-click within the prevent (while still zoomed out) and youll also be able to give the team a name, which - if you go on to add another 20 or 30 programs to your Begin display - will make it much more readily found the tools you need.

4. Immediate accessibility menu
Right-click in the end remaining area (or keep down the Windows key and press X) for a text-based selection that provides comfortable accessibility lots of useful applets and features: Device Administrator, Management Board, Traveler, the Search discussion and more.

5. Find your applications
The Win+X selection is useful, but no alternative for the old Begin selection as it doesnt provide accessibility your programs. To discover this, keep down the Windows key and press Q or either right-click an vacant aspect of the Begin display or run your handy up from the end of the display and select All Apps to expose a scrolling record of all your installed programs. Browse the various flooring to discover what you need and select the relevant app to release it.

6. Easy access
If theres an program you use all the time then you dont have to accessibility it via the look for program. Pin it to the Begin display and itll be available at a click.
Start by writing aspect of the name of your program. To accessibility Management Board, for example, type Control. Right-click the Control Panel floor on the Apps Search display, and then click Pin to Start. If youre using a touchscreen display screen, press and keep the symbol, then film down and select Pin to Start.
Now press the Windows key, look for to the right and youll see the Management Board floor at the far end. Drag and fall this over to the remaining somewhere if youd like it more readily available, then select the floor to open the pc along with the Management Board window, and press the Windows key to come back you to the Begin display when youre done.

Apps close


7. Closing down
To closed Windows 8 down, just move the rabbit suggestion to the end right area of the display, select the Configurations symbol - or just keep down the Windows key and press I - and youll see a energy key. Simply click this and select Shut Down or Restart.
Some of the techniques available in past editions of Windows still apply. Media Ctrl+Alt+Del, for example, select the energy key in the end right-hand area and youll be presented with the same Shut Down and Restart choices.
And if youre on the pc, press Alt+F4 and youll be able to select Shut Down, Restart, Sign Out or Switch User choices.

8. App bar
Windows 8 programs aim to be simpler than old-style Windows applets, which means its farewell to choices, complex tool bars, and many customer interface requirements. There will usually be a few choices available on the App bar, though, so if youre uncertain what to do then either right-click an vacant aspect of the display, press Windows+Z or film your handy up from the end of the display to take a closer look.

9. Whats running?
If you release a Windows 8 app, play with it for a while, then press the Windows key youll change back to the Begin display. Your app will remaining operating, but as theres no taskbar then you might be wondering how youd ever discover that out.
You could just press Alt+Tab, which shows you whats operating just as it always has.
Holding down the Windows key and pushing Tab shows a lite on the left-hand part of the display with your operating programs. (To see this with the rabbit, move your suggestion to the top remaining area of the display, wait until the thumbnail of one app appears, then move down.)
And of course you can always press Ctrl+Shift+Esc to see all your operating programs in the Process Administrator, if you dont mind (or actually need) the extra technical detail.

10. Closing an app
Windows 8 programs dont have near control buttons, but this isnt the issue you might think. Apps are revoked when you change to something else so theyre only a very minimal strain on your program, and if you need the resources then theyll instantly be closed down. (Their perspective will be saved, of course, so on relaunching theyll carry on where you remaining off.)
If you want to shut down an app anyway, though, move the rabbit suggestion up to the top of the display. When it turns from the frequent rabbit suggestion to the symbol of a part, keep down the remaining rabbit and move it down the display. Your app should reduce to a thumbnail which you can move off the display to shut it.
If thats too much hassle, then simply pushing Alt+F4 still works.
And when all else is not able then press Ctrl+Shift+Esc to release Process Administrator, right-click something in the Apps record and select End Process. Be careful, though, near something you shouldnt and its simple to crash or freeze your PC.
Read more »