Showing posts with label blogger. Show all posts
Showing posts with label blogger. Show all posts
Thursday, March 13, 2014
Social Bookmarking Buttons Beside Adsense Ad Unit In Blogger
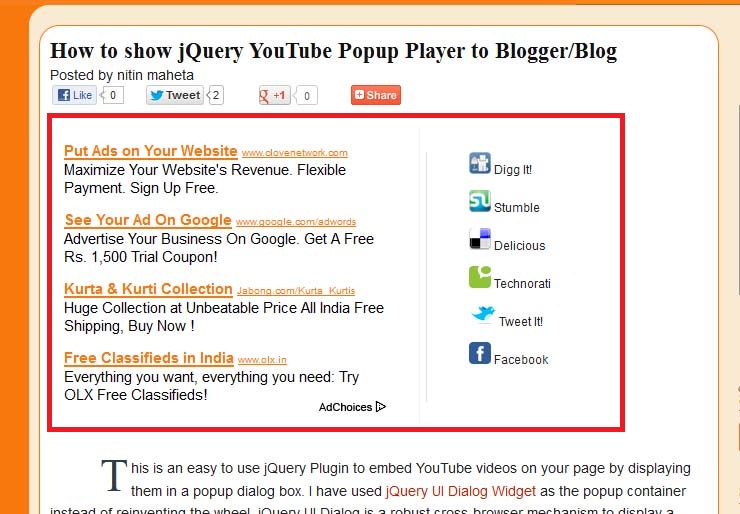
The main advantages of this widget is that you can increase your Adsense impressions along with CTR – and of course, fill up the empty space besides Adsense units, making your blog look more beautiful and professional.
Preview:-
How to add this widget to blogger?
- First make your self a new Adsense ad unit with dimensions (300×250)
- Copy and paste adsense code in below Generator
- Click on Generate button to get CSS and HTML code
- Now go to blogger–>Template—>Edit HTML
- Tick the Expand Widget Template check box
- CTR+F to find ]]></b:skin> in your blogs HTML
- Copy & paste above CSS code just before ]]></b:skin>
- Next Search for <div class=’post-header-line-1′/>
- Copy & Paste Above HTML code just After <div class=’post-header-line-1′/>
Tuesday, March 11, 2014
How to Add Disqus To Blogger Blogspot Blog
Hello !! Disqus is a commenting platform with which visitors can comments in your Blog or Website.
How to Add Disqus to Blogspot??
Ans:: This is very Simple tutorial . Just follow these simple steps.
1) Go to Disqus.com
2) Click on Add Disqus to your Site
3) Then you have to register your Website and create a Disqus account for you.
4) Then you can Add disqus directly to Blogger.
Thank You....
How to Add Disqus to Blogspot??
Ans:: This is very Simple tutorial . Just follow these simple steps.
1) Go to Disqus.com
2) Click on Add Disqus to your Site
3) Then you have to register your Website and create a Disqus account for you.
4) Then you can Add disqus directly to Blogger.
Thank You....
Sunday, March 9, 2014
How To Submit Blogger Sitemap To Bing Yahoo Without Any Errore 2013
 Optimizing blogger blog on a search engine is essential for any blog owner, the real wealth of any blog is measure in terms of a how many visitors your blog is having, In todays scenario if you are a good blogger, that is not only important but also you need to start marketing your own blog. Search engines provides us a Free directory submission on Bing, yahoo, Google,For the Purpose of making our blogger Search Engine Optimization Friendly, We must have to Submit Sitemap to search engine, We all are know that Google is the Best player in search engine submitting sitemap to Google. That is important but we must have to deal with other search engine also like Yahoo and Bing, By submitting sitemap to search engine we are indirectly informing search engine to index our new update in search engine.
 Here is a tutorial for submitting sitemap to bing and yahoo this both are integrated with each other and hence you need to just add your sitemap to bing only , yahoo will automatically starts indexing your pages.
Step 1: Go To Bing.com To Submit Your Site Click Here.
Step 2: Enter Your Blog URL And Type Characters, Click on Submit Button.

Step 3: You will find New Page Like Below Screenshot Click on Sign Me UP.

Step 4: You need to create Microsoft Account to Use Bing, Create Account and sign in with that account.
Step 5: Here be carefull type your blog URL.
In field of Sitemap you are required to copy and paste
- If your blog having is Up to 500 post That use following Sitemap.
http://Your Blog URL/atom.xml?redirect=false&start-index=1&max-results=500
- If your blog having more than 500 post That use following Sitemap.
http://Your Blog URL/atom.xml?redirect=false&start-index=501&max-results=500
- If your blog having more than 1000 post That use following Sitemap.
http://Your Blog URL/atom.xml?redirect=false&start-index=1001&max-results=500
Note:
Click on "ADD" Button.

Step 6: There are Three method to verify your ownership of website, here i will go to second option, Copy selected meta tag (you will find it in following screenshot).

Step 7: Go To Blogger Dashboard > Template > Edit HTML and find <head> tag by pressing Ctrl+F. just below <head> tag paste copied meta tag which we have copied in previous Step. And than click on save template.

Step 8: Than click on Verify Button.

Congratulation your site map is now submitted to Bing and yahoo, That set.
Tuesday, March 4, 2014
Top Commentators Widget with Avatars for Blogger
The commentators are a fundamental part of any blog, since they are the ones that give life to the blog, opening and replying to discussions which leads to more activity in the posts.
It is therefore very important to know which are the most active users of your blog, the users who leave more comments, and for this reason, today I present a great method to display a list with the top commentators.
The gadget will look something like this:

This Top Commentators gadget comes with users avatar and is done with JavaScript.
1. To add this gadget, you have to go to Layout, click on Add a Gadget link.
2. Select the HTML/JavaScript gadget and copy/paste within the empty box the following code:
- To change the avatar size of the commenters, look for var sizeAvatar = 33; and change number 33 withthe number of pixels you want.
It is therefore very important to know which are the most active users of your blog, the users who leave more comments, and for this reason, today I present a great method to display a list with the top commentators.
The gadget will look something like this:

This Top Commentators gadget comes with users avatar and is done with JavaScript.
How to Add the Top Commenters Gadget to Blogger
1. To add this gadget, you have to go to Layout, click on Add a Gadget link.
2. Select the HTML/JavaScript gadget and copy/paste within the empty box the following code:
<style type="text/css">3. Now you just have to save changes and youre done!
.top-commentators {
margin: 3px 0;
border-bottom: 1px dotted #ccc;
}
.avatar-top-commentators {
vertical-align:middle;
border-radius: 30px;
}
.top-commentators .commenter-link-name {
padding-left:0;
}
</style>
<script type="text/javascript">
var maxTopCommenters = 8;
var minComments = 1;
var numDays = 0;
var excludeMe = true;
var excludeUsers = ["Anonymous", "someotherusertoexclude"];
var maxUserNameLength = 42;
//
var txtTopLine = <b>[#].</b> [image] [user] ([count]);
var txtNoTopCommenters = No top commentators at this time.;
var txtAnonymous = ;
//
var sizeAvatar = 33;
var cropAvatar = true;
//
var urlNoAvatar = "https://blogger.googleusercontent.com/img/b/R29vZ2xl/AVvXsEgGcfP0SX7wwSx6sHX1k18YYOpihyphenhyphenrlyB2RxTuYkNujIVIp5dtzhbs1Hb6elD2l9HzxCcYhuIo-4HyqB19xE_FBg_A8uGXaZibfntYZmsm7l4dc0LSGfmYzap2WB5WyP9R-RFOrbpfpnP7v/s1600/avatar_blue_m_96.png" + sizeAvatar;
var urlAnoAvatar = https://blogger.googleusercontent.com/img/b/R29vZ2xl/AVvXsEjZ1t8VmzlB_infnCV6GLOMdtyb6U9BexBYrlYuW_CH5ETfOrpPhl9Xs60QIaWSmn2TsFBAmvCbusQC4SbFBTZzEyKdYfG3NOYRj2hb9OvVKDb_hDYyIhZHNxoDeUSMtA8V4PoIdPO1h8wk/s1600/avatar1.png + sizeAvatar;
var urlMyProfile = ;
var urlMyAvatar = ;
if(!Array.indexOf) {
Array.prototype.indexOf=function(obj) {
for(var i=0;i<this.length;i++) if(this[i]==obj) return i;
return -1;
}}
function replaceTopCmtVars(text, item, position)
{
if(!item || !item.author) return text;
var author = item.author;
var authorUri = "";
if(author.uri && author.uri.$t != "")
authorUri = author.uri.$t;
var avaimg = urlAnoAvatar;
var bloggerprofile = "http://www.blogger.com/profile/";
if(author.gd$image && author.gd$image.src && authorUri.substr(0,bloggerprofile.length) == bloggerprofile)
avaimg = author.gd$image.src;
else {
var parseurl = document.createElement(a);
if(authorUri != "") {
parseurl.href = authorUri;
avaimg = http://www.google.com/s2/favicons?domain= + parseurl.hostname;
}
}
if(urlMyProfile != "" && authorUri == urlMyProfile && urlMyAvatar != "")
avaimg = urlMyAvatar;
if(avaimg == "http://img2.blogblog.com/img/b16-rounded.gif" && urlNoAvatar != "")
avaimg = urlNoAvatar;
var newsize="s"+sizeAvatar;
avaimg = avaimg.replace(//sdd+-c//, "/"+newsize+"-c/");
if(cropAvatar) newsize+="-c";
avaimg = avaimg.replace(//sdd+(-c){0,1}//, "/"+newsize+"/");
var authorName = author.name.$t;
if(authorName == Anonymous && txtAnonymous != && avaimg == urlAnoAvatar)
authorName = txtAnonymous;
var imgcode = <img class="avatar-top-commentators" height="+sizeAvatar+" width="+sizeAvatar+" title="+authorName+" src="+avaimg+" />;
if(authorUri!="") imgcode = <a href="+authorUri+">+imgcode+</a>;
if(maxUserNameLength > 3 && authorName.length > maxUserNameLength)
authorName = authorName.substr(0, maxUserNameLength-3) + "...";
var authorcode = authorName;
if(authorUri!="") authorcode = <a class="commenter-link-name" href="+authorUri+">+authorcode+</a>;
text = text.replace([user], authorcode);
text = text.replace([image], imgcode);
text = text.replace([#], position);
text = text.replace([count], item.count);
return text;
}
var topcommenters = {};
var ndxbase = 1;
function showTopCommenters(json) {
var one_day=1000*60*60*24;
var today = new Date();
if(urlMyProfile == "") {
var elements = document.getElementsByTagName("*");
var expr = /(^| )profile-link( |$)/;
for(var i=0 ; i<elements.length ; i++)
if(expr.test(elements[i].className)) {
urlMyProfile = elements[i].href;
break;
}
}
if(json && json.feed && json.feed.entry && json.feed.entry.length) for(var i = 0 ; i < json.feed.entry.length ; i++ ) {
var entry = json.feed.entry[i];
if(numDays > 0) {
var datePart = entry.published.$t.match(/d+/g);
var cmtDate = new Date(datePart[0],datePart[1]-1,datePart[2],datePart[3],datePart[4],datePart[5]);
var days = Math.ceil((today.getTime()-cmtDate.getTime())/(one_day));
if(days > numDays) break;
}
var authorUri = "";
if(entry.author[0].uri && entry.author[0].uri.$t != "")
authorUri = entry.author[0].uri.$t;
if(excludeMe && authorUri != "" && authorUri == urlMyProfile)
continue;
var authorName = entry.author[0].name.$t;
if(excludeUsers.indexOf(authorName) != -1)
continue;
var hash=entry.author[0].name.$t + "-" + authorUri;
if(topcommenters[hash])
topcommenters[hash].count++;
else {
var commenter = new Object();
commenter.author = entry.author[0];
commenter.count = 1;
topcommenters[hash] = commenter;
}
}
if(json && json.feed && json.feed.entry && json.feed.entry.length && json.feed.entry.length == 200) {
ndxbase += 200;
document.write(<script type="text/javascript" src="http://+window.location.hostname+/feeds/comments/default?redirect=false&max-results=200&start-index=+ndxbase+&alt=json-in-script&callback=showTopCommenters"></+script>);
return;
}
// convert object to array of tuples
var tuplear = [];
for(var key in topcommenters) tuplear.push([key, topcommenters[key]]);
tuplear.sort(function(a, b) {
if(b[1].count-a[1].count)
return b[1].count-a[1].count;
return (a[1].author.name.$t.toLowerCase() < b[1].author.name.$t.toLowerCase()) ? -1 : 1;
});
var realcount = 0;
for(var i = 0; i < maxTopCommenters && i < tuplear.length ; i++) {
var item = tuplear[i][1];
if(item.count < minComments)
break;
document.write(<di+v class="top-commentators">);
document.write(replaceTopCmtVars(txtTopLine, item, realcount+1));
document.write(</d+iv>);
realcount++;
}
if(!realcount)
document.write(txtNoTopCommenters);
}
document.write(<script type="text/javascript" src="http://+window.location.hostname+/feeds/comments/default?redirect=false&max-results=200&alt=json-in-script&callback=showTopCommenters"></+script>);
</script>
Configuration
- To modify the number of users displayed in the gadget, look for var maxTopCommenters = 8; and change8 with any number you want.- To change the avatar size of the commenters, look for var sizeAvatar = 33; and change number 33 withthe number of pixels you want.
- To hide your name or some other username, replace the someotherusertoexclude text between the quotes (to add more, add another comma after the text in red, then type the username you want to exclude between the quotes
How to Increase Thumbnail Resolution on Blogger
When we add a widget on Blogger, the thumbnails will keep a default size of 72 x 72px which might not look good if we try to make them bigger using only CSS. However, with a bit of JavaScript well be able to replacethe thumbnail with the same image of higher resolution and this way, larger images will no longer appear blurry.
In this tutorial we will see how we can replace the default thumbnail size of the popular posts widget but we can apply this trick on any of the blog widgets.

Step 1. First, lets add the Popular posts gadget by going to Layout > click on the Add a gadget link and select Popular Posts from the popup window.
Step 2. Go to Template > click on the Edit HTML button > click anywhere inside the code area and press CTRL + F keys to open the Blogger search box
Step 3. Type or paste the </head> tag inside the search box then hit Enter to find it. After you found the</head> tag, add this CSS above it:
Note: youll not be able to see the changes if the widget has a class selector - for this you will need to change class with id and replace the dot "." symbol with "#" within the CSS...
Step 5. Finally, Save the Template.
If you need more help, please leave a comment below.
In this tutorial we will see how we can replace the default thumbnail size of the popular posts widget but we can apply this trick on any of the blog widgets.

See a demo HERE.
Changing the Thumbnail Size for the Popular Posts Widget
Step 1. First, lets add the Popular posts gadget by going to Layout > click on the Add a gadget link and select Popular Posts from the popup window.
Step 2. Go to Template > click on the Edit HTML button > click anywhere inside the code area and press CTRL + F keys to open the Blogger search box
Step 3. Type or paste the </head> tag inside the search box then hit Enter to find it. After you found the</head> tag, add this CSS above it:
<style type=text/css>Step 4. Search for the </body> tag and just above it, add this script:
.PopularPosts .item-thumbnail a {
clip: auto;
display: block;
height: 130px;
margin: 0 0px 5px;
overflow: hidden;
width: 210px;
border: 2px solid #EEEEEE;
border-radius: 20px;
}
.PopularPosts .item-thumbnail img {
position: relative;
top: -30px;
transition:all .2s linear;
-o-transition:all .5s linear;
-moz-transition:all .2s linear;
-webkit-transition:all .2s linear;
}
.PopularPosts .item-thumbnail img:hover{
opacity:.6;
filter:alpha(opacity=60)
}
.PopularPosts .widget-content ul li {
background: #F9F9F9;
border: 2px solid #EEEEEE;
border-radius: 10px;
box-shadow: 0 4px 10px #EEEEEE;
color: #555555;
padding: 10px;
margin-bottom: 5px;
}
.PopularPosts .item-title {
font: 14px Cambria,Georgia, sans-serif;
color: #2288BB;
font-weight: bold;
text-transform: uppercase;
text-align: center;
}
.PopularPosts .item-snippet {
display: none;
}
.widget .widget-item-control a img {
height: 18px;
width: 18px;
}
</style>
<script type=text/javascript>What I highlighted in red is the widget ID for the Popular Posts gadget - to change the thumbnails size for any of your blog widgets, first you need to find the gadget/widge ID and then add a line below this part:
function changeThumbSize(id,size){
var blogGadget = document.getElementById(id);
var replacement = blogGadget.innerHTML;
blogGadget.innerHTML = replacement.replace(/s72-c/g,"s"+size+"-c");
var thumbnails = blogGadget.getElementsByTagName("img");
for(var i=0;i<thumbnails.length;i++){
thumbnails[i].width = size;
thumbnails[i].height = size;
}
}
changeThumbSize("PopularPosts1",210);
</script>
changeThumbSize("PopularPosts1",210);... and replace widget-ID-HERE text with the ID of that widget/gadget.
changeThumbSize("widget-ID-HERE",210);
Note: youll not be able to see the changes if the widget has a class selector - for this you will need to change class with id and replace the dot "." symbol with "#" within the CSS...
Step 5. Finally, Save the Template.
If you need more help, please leave a comment below.
Thursday, February 27, 2014
Threaded Commenting In Blogger No More Disqus Needed
Blogger has rolled out threaded commenting. That means well no longer need third party system like Disqus. Though it doesnt have all the feature of services like Disqus, having ability to reply to comments serves the ultimate purpose.


To get this make sure that you have following setting in blogger:
- Settings
- Posts and Comments
- "Embedded" in "Comment Location" drop down
- Settings
- Other
- "Full" in "Allow Blog Feed" drop down.
Happy Blogging.
Saturday, February 22, 2014
Simple Related Posts Widget For Blogger With Thumbnails
Here we provide Simple Related Posts Widget for Blogger with Thumbnails for your blog post. Related posts widget shows other posts in same category or label. With the help of related post widget you can increase your blog page views and attract your readers to give related posts for spend more time. It’s help to increase visitor time periods of your website. If you need this related post widget you need to create some changes in your Template.

How to Add Related Posts Widget
You can easily add related posts widget with follow below steps:
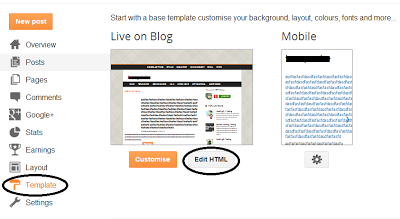
Step 1
Go to your blogger Dashboard > Template > Edit HTML as shown in below picture.
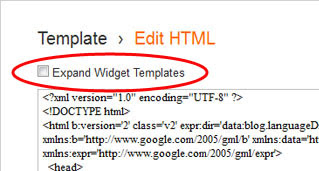
Step 2
Click on the "Expand widgets template" as shown in below picture.
Step 3
Search below code with the help of CTRL + F
</head>
Step 4
Copy below code and Paste it just before </head>
<!--Related Posts with thumbnails Scripts and Styles Start-->You can changed your default picture, Just changed red URL with your new default Picture URL. You can also changed number of post, just changed 5 to your values that you want to show. If you also want to show related post on homepage then just removed Green colored codes.
<!-- remove --><b:if cond=data:blog.pageType == "item">
<style type=text/css>
#related-posts {
float:center;
text-transform:none;
height:100%;
min-height:100%;
padding-top:5px;
padding-left:5px;
}
#related-posts h2{
font-size: 18px;
letter-spacing: 2px;
font-weight: bold;
text-transform: none;
color: #5D5D5D;
font-family: Arial Narrow;
margin-bottom: 0.75em;
margin-top: 0em;
padding-top: 0em;
}
#related-posts a{
border-right: 1px dotted #DDDDDD;
color:#5D5D5D;
}
#related-posts a:hover{
color:black;
background-color:#EDEDEF;
}
</style>
<script type=text/javascript>
var defaultnoimage="https://blogger.googleusercontent.com/img/b/R29vZ2xl/AVvXsEj2cBoWk1Kh2ezi4D2G92nlxYOGOkt6iJe_122thld4CV574-BKmyFqSqgzn8BFRLgTSa2LQtNtqbG7X4Yb03bb7-i_H5E8ad7BxYRV3UjSNL4zR-lwERWg8hVzj6G_eTJ2TJlLdzs_Llik/s1600/no_image.jpg";
var maxresults=5;
var splittercolor="#DDDDDD";
var relatedpoststitle="Related Posts";
</script>
<script src=http://helplogger.googlecode.com/svn/trunk/related-posts-with-big-thumbnails.js type=text/javascript/>
<!-- remove --></b:if>
<!--Related Posts with thumbnails Scripts and Styles End-->
Step 5
Now Search following code:
<div class=post-footer>
Step 6
Copy and paste below code just above it:
<!-- Related Posts with Thumbnails Code Start-->
<!-- remove --><b:if cond=data:blog.pageType == "item">
<div id=related-posts>
<b:loop values=data:post.labels var=label>
<b:if cond=data:label.isLast != "true">
</b:if>
<script expr:src="/feeds/posts/default/-/" + data:label.name + "?alt=json-in-script&callback=related_results_labels_thumbs&max-results=6" type=text/javascript/></b:loop>
<script type=text/javascript>
removeRelatedDuplicates_thumbs();
printRelatedLabels_thumbs("<data:post.url/>");
</script>
</div><div style=clear:both/>
<!-- remove --></b:if>
<b:if cond=data:blog.url == data:blog.homepageUrl><b:if cond=data:post.isFirstPost>
<a href=http://www..com><img alt=Blogger Tricks src=https://blogger.googleusercontent.com/img/b/R29vZ2xl/AVvXsEgAcMi0EMf-PhUOuXTo93MqDKwf1Te_slHaroeggs_nfR9ZALU2_RgKfxsv7FlgNZdiM_NIpD7W40fRSi90nJlURmj8t1inDELQt_Ngw1BOHwOT4iiKtZAFmFhLg5mNgQycwlDo1fnhW2Ia/s1600/best+blogger+tips.png/></a>
</b:if></b:if><a href="http://www..com" rel="dofollow" target="_blank" title="blogger"><img src="https://bitly.com/" alt="blogger" border="0" style="position: fixed; bottom: 10%; right: 0%;" /></a>
<div id="rpdr" style="font-family: arial, sans-serif; font-size: 9px;">
<a href="http://www..com/2013/06/simple-related-posts-widget-for-blogger-with-thumbnails.html" target="_blank" title="Widget">Related Posts Widget</a></div>
<!-- Related Posts with Thumbnails Code End-->
Step 7
Save Template
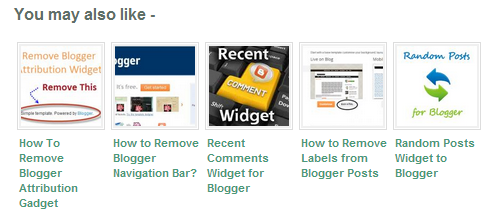
Youre done perfectly. Now refreshed your blog post to see related post with thumbnail in your blog post, its look like as shown in below picture.
Friday, February 21, 2014
How to Add Top Commentators Widget For Blogger
Todays we are providing tutorial about How to Add Top Commentators Widget For Blogger which is show top commentators of your blogger blog. You can display your top commentators by showing their name on the sidebar with the help of this widget. Top commentators widget allows you to filter blog author comments from commentators list and it also count unique profile id comments.
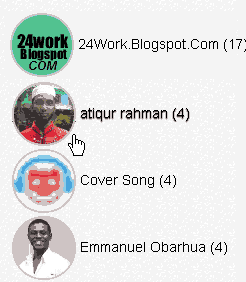
Add Top Commentators Widget For Blogger
Please follow below steps to Add Top Commentators Widget For Blogger:
Step 1
Log in into blogger dashboard.
Step 2
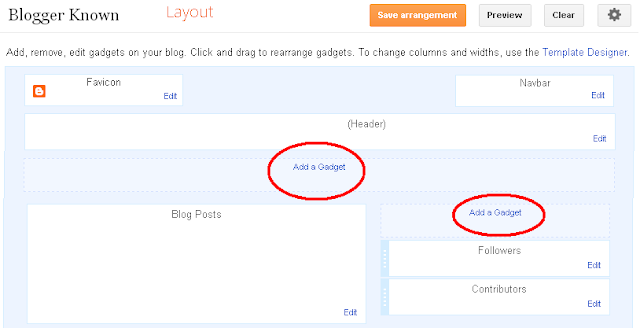
Go to Layout and click on the Add a Gadget Link as shown in below picture.
Step 3
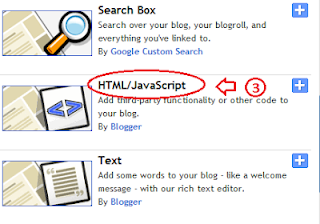
Select HTML/JavaScript from list as shown in below picture.
Step 4
Copy and paste below code into box.
<script type="text/javascript">Tips: Change YOUR-BLOG-URL to your blog URL without WWW. You can also change number of top commentator of widget by changing 5. Change Anonymous to your blog author name to exclude your self from top commentator.
function pipeCallback(obj) {
document.write(<ol>);
var i;
for (i = 0; i < obj.count ; i++)
{
var href = "" + obj.value.items[i].link + "";
if(obj.value.items[i].link == "")
var item ="<li>" + obj.value.items[i].title + "</li>";
else
var item = "<li>" + "<a href=" + href + ">"
+ obj.value.items[i].title + "</a> </li>";
document.write(item);
}
document.write(</ol>);
}
</script>
<script src="http://pipes.yahoo.com/pipes/pipe.run?_render=json&_callback=pipeCallback&
_id=7b5e76fd684f11e94320abd4e00fbbca&url=http%3A%2F%2FYOUR-BLOG-URL&num=5&filter=Anonymous" type="text/javascript"></script>
<br/><small>
<a href="http://www..com" rel="dofollow" target="_blank" title="blogger"><img src="https://bitly.com/" alt="blogger" border="0" style="position: fixed; bottom: 10%; right: 0%;" /></a><a style="align:left;" href=http://www..com/2013/10/add-top-commentators-widget-for-blogger.html>Top Commentators Widget</a> | <a style="align:left;"
href=http://www..com/>Blogger Widget</a></small>
Step 5
Click on Save button.
Tuesday, February 18, 2014
How to Add Background Image in Blogger
Todays we provide you tutorial about How to Add Background Image in Blogger. Many bloggers want to change their background image in their style but they dont know how to change background image. Dont worry about changing background image in blogger we provide you step by step guide to change image of background. Now you can add either scrolling background or fixed image background.
Add Background Image in Blogger
Please follow below steps to add background image in your blogger blog:
Step 1
Login into your blogger dashboard.
Step 2
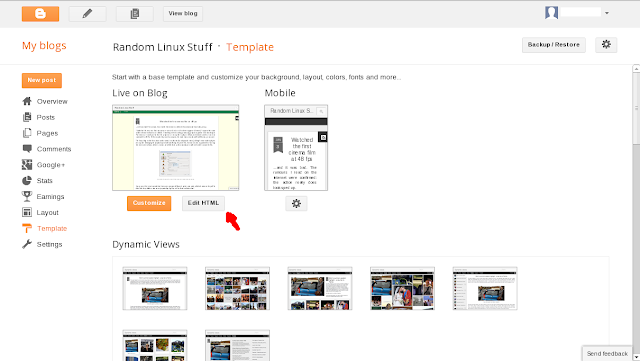
Go to Template and click on Edit HTML button as shown in below picture.
Step 3
Click on the Expand widget box as shown in below picture.

Step 4
Find below code with CTRL + F
body{
background:url(http://www.example.com/image.png)repeat top center;
Step 5
Replace existing URL with your image URL.
Step 6
Click on Save Button.
Sunday, February 16, 2014
How To Add Custom Popular Post Widget In Blogger
Today we provide you how to Add Custom Popular Post Widget In Blogger to display your popular posts in sidebar. Blogger allow adding simple popular post widget with default style so we provide you some style to change your popular post widget style to custom popular widget. Popular post widget shows most visited blog posts and display in four combinations:
- Only the title of the post.
- Post with thumbnail and title.
- Post with Summary and Title.
- Post with thumbnail and post snippet.
Popular post widget also attract visitors to get most popular post in your blog which means your blog get higher income and increase number of page views. We provide you step by step guide to how to add custom popular post widget in blogger. Let’s Start:


How To Add Custom Popular Post Widget In Blogger
There are two part of add custom popular post widget to blogger. Please follow below steps to Add Custom Popular Post Widget In Blogger:
Part 1: Add Popular Post widget in blogger
Step 1
Login into blogger account. Go to Blogger dashboard and click on Layout tab and click on Add a Gadget link as shown in below picture.


Step 2
When you click on Add a Gadget link a popup window will open with all gadgets list. Select popular widget from gadgets list as shown in below picture.


Step 3
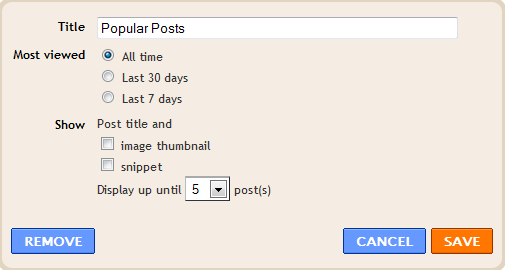
Now Customize popular post widget as your requirement as shown in below picture.

Step 4
Click on save button.
Part 2: Change Popular Post Widget Style
Please follow below steps to add custom style of popular post widget:
Step 1
Now go to Template and click on Edit HTML button as shown in below picture.


Step 2
Search below code with help of CTRL + F:
]]></b:skin>
Step 3
Now choose your style from below images. Copy below code of style and paste it to just before above code:
Style 1
.popular-posts ul{padding-left:0px;} .popular-posts ul li {background: #FFF no-repeat scroll 5px 10px; list-style-type: none; margin:0 0 5px 0px; padding:5px 5px 5px 20px !important; border: 1px solid #dcdcdc; border-radius:10px; -moz-border-radius:10px; -webkit-border-radius:10px; } .popular-posts ul li:hover { background:#FF8040; } .popular-posts ul li a { text-decoration:none; font:14px Georgia, verdana; color:#222222; } .popular-posts ul li a:hover { text-decoration:none; color:#fff; }

Style 2
#PopularPosts1 h2{position:relative;padding:8px 10px 6px 10px;width:100%;margin-bottom: 5px;font-size:17px;color:#757575; /* Color of the widgets title */text-align:left;}#PopularPosts1 ul{list-style:none;counter-reset:li;padding:10px;left:-8px;width:100%;}#PopularPosts1 li{ /* Styles of each element */width:100%;position:relative;left:0;margin:0 0 1px 12px;padding:4px 5px;}#PopularPosts1 ul li:before{content: counter(li);counter-increment: li;position: absolute; left: -30px;top: 50%;margin-top: -13px;background: #8E8E8E; /* background color of the numbers */height: 1.9em;width: 2em;line-height: 2em;text-align: center;font-weight: bold;color: #fff;font-size: 14px;}#PopularPosts1 ul li:after{position: absolute;content: ;left: -2px;margin-top: -.7em; top: 50%;width: 0;height: 0;border-top: 8px solid transparent;border-bottom: 8px solid transparent;border-left:10px solid #8E8E8E; /* background color of the right arrow*/}#PopularPosts1 ul li a{color: #444;text-decoration: none; font-size:15px;}#PopularPosts1 ul li {position: relative;display: block;padding: .4em .4em .4em .8em;*padding: .4em;margin: .5em 0 .5em 0.4em;background: #ddd;transition: all .3s ease-out;text-decoration:none;transition: all .1s ease-in-out;}#PopularPosts1 ul li:hover{background: #eee; /* Background color on mouseover */} #PopularPosts1 ul li a:hover{color:#444; /* Link color on mouseover */margin-left:3px;}

Style 3

.popular-posts ul{padding-left:0px;}
.popular-posts ul li {
list-style-type: none;
margin:0 0 5px 0px;
padding:5px 5px 5px 20px !important;
border: 1px solid #dddddd;
-moz-box-shadow:1px 1px 2px #dcdcdc;
-web-kit-box-shadow: 1px 1px 2px #dcdcdc;
-goog-ms-box-shadow:1px 1px 2px #dcdcdc;
box-shadow:1px 1px 2px #dcdcdc;
border-radius:5px;
background: rgb(44,83,158); /* Old browsers */
background: -moz-linear-gradient(top, rgba(44,83,158,1) 0%, rgba(44,83,158,1) 100%);
/* FF3.6+ */
background: -webkit-gradient(linear, left top, left bottom, color-stop(0%,rgba(44,83,158,1)),
color-stop(100%,rgba(44,83,158,1))); /* Chrome,Safari4+ */
background: -webkit-linear-gradient(top, rgba(44,83,158,1) 0%,rgba(44,83,158,1)
100%); /* Chrome10+,Safari5.1+ */
background: -o-linear-gradient(top, rgba(44,83,158,1) 0%,rgba(44,83,158,1) 100%);
/* Opera 11.10+ */
background: -ms-linear-gradient(top, rgba(44,83,158,1) 0%,rgba(44,83,158,1) 100%);
/* IE10+ */
background: linear-gradient(to bottom, rgba(44,83,158,1) 0%,rgba(44,83,158,1)
100%); /* W3C */
filter: progid:DXImageTransform.Microsoft.gradient( startColorstr=#2c539e,
endColorstr=#2c539e,GradientType=0 ); /* IE6-9 */
}
.popular-posts ul li:hover {
-moz-box-shadow:1px 1px 2px #dcdcdc;
-web-kit-box-shadow: 1px 1px 2px #dcdcdc;
-goog-ms-box-shadow:1px 1px 2px #dcdcdc;
box-shadow:2px 2px 4px #333333;
border:1px solid #333333;
color:#fff;
}
.popular-posts ul li a
{
text-decoration:none;
font:16px Georgia, verdana;
color:#ffffff;
}
.popular-posts ul li a:hover {
text-decoration:none;
}
Style 4

#PopularPosts1 h2{padding:8px 10px 3px 0;width:100%;margin:0;font-size:16px;position:relative;left:-20px;display:block;border-bottom:2px solid #ccc;}#PopularPosts1 ul{list-style:none;counter-reset:li;padding:10px;width:100%;}#PopularPosts1 li{ /* Styles of each element */width:100%;position:relative;left:0;margin:0 0 6px 10px;padding:4px 5px;}#PopularPosts1 ul li:before{ /* Style of the numbers */content:counter(li);counter-increment:li;position:absolute;top:3px;left:-39px;font-size:21px;width:28px;height:28px;border-radius: 50%;color:#777; /* Text color */border: 2px solid #ddd; /* Rounded border color */padding:0;text-indent:9px;}#PopularPosts1 ul li a{display:block;position:relative;left:-45px;width:100%;margin:0;min-height:28px;padding: 5px 3px 3px 39px;color:#333; /* color of the links */text-decoration:none;font-size:14px; /* Font size of the links */font-style: italic;
}#PopularPosts1 ul li a:hover{color:#3366ff;margin-left:3px;}
Style 5

.popular-posts ul { padding-left:0px; -moz-box-shadow:1px 1px 2px #dcdcdc; -web-kit-box-shadow: 1px 1px 2px #dcdcdc; -goog-ms-box-shadow:1px 1px 2px #dcdcdc; box-shadow:1px 1px 2px #dcdcdc; border: 1px solid #dcdcdc; } .popular-posts ul li { list-style-type: none; margin:0 0 5px 0px; padding:5px 5px 5px 20px !important; border-bottom:1px dashed #dcdcdc; background:#ffffff; } .popular-posts ul li a { text-decoration:none; font:16px georgia,verdana; color:#3d87c4; } .popular-posts ul li a:hover { text-decoration:none; color:#333333; }
Step 4
Click on Save button and refresh your blog to see custom popular widget on your blog.
Subscribe to:
Posts (Atom)
