Showing posts with label custom. Show all posts
Showing posts with label custom. Show all posts
Friday, March 7, 2014
Custom Notifications With Notif
Ever since Android saw a total revamp of its pulldown notification system, I’ve been impressed. I’d always wondered, though, how could I create my own custom notifications? After doing some research, I discovered Notif.
Notif allows you to create four different types of custom notification, and it does it all for free.
When I stumbled upon Notif, I was really just looking for the best app to help me keep a list of things I needed to do. I’d tried Astrid, given Tasks a to-do, but I was unimpressed with their widgets and didn’t want to have to open anything up to check out my list.
Upon finding Notif, however, everything changed. To start, you can create four different types of notifications (Default, Big Text, Big Picture, and List). Each one comes with different options and looks, so you can create whatever you need.
Default is the standard Android notification. Your notification is limited to a title and approximately one short line of text.
Big Text expands upon the Default idea, giving you fields to add a title, an expanded title (what the title becomes when you pinch-scroll the notification to its full size), and a content box. I added a few sentences into my content box, and when I pulled the Big Text notification to its maximum size, everything fit, like magic.
Big Picture is the same kind of notification you get if you take a picture, but you also have the ability to add lots of text, like with the Big Text option. Currently, pictures taken within Notif aren’t high-quality, so you need to take your picture first, then use the ‘Get Photo’ option to have a truly beautiful picture in your notification bar.
If you leave the notification minimized, a small thumbnail of your picture is displayed. Upon pulling it to full size, the picture grows in size and all of your words are displayed.

Finally, we get to the List option (my favorite!). List is pretty straightforward; title your list and add up to seven tasks to said list. That’s it. You can also type up a list summary, in case you want to minimize your list, but otherwise, that’s everything.
The gear icon to the right of each notification’s title (when creating a notification) allows you to choose what icon you’d like your notification to have in the pulldown menu. The free version includes 20, but if you upgrade to the Pro version, you unlock all 200 icons.
You can also make any notification an ongoing notification (meaning you can’t swipe left or right to remove it), which is great for guaranteeing you don’t accidentally remove something before you intended to. The downside is, you have to then go back into the Notif app proper and tap the double-flag icon.
Notable downsides include not being able to cross items off of lists as you go along (that’d be something Tasks or Astrid is more equipped to do), and not being able to save templates. However, for an app that’s following all of the Holo design guidelines, and at no cost, these are small downsides.
Notif is only compatible with Android devices running 4.1 and higher, and can be found in the Google Play Store completely and absolutely free.

Sunday, February 16, 2014
How To Add Custom Popular Post Widget In Blogger
Today we provide you how to Add Custom Popular Post Widget In Blogger to display your popular posts in sidebar. Blogger allow adding simple popular post widget with default style so we provide you some style to change your popular post widget style to custom popular widget. Popular post widget shows most visited blog posts and display in four combinations:
- Only the title of the post.
- Post with thumbnail and title.
- Post with Summary and Title.
- Post with thumbnail and post snippet.
Popular post widget also attract visitors to get most popular post in your blog which means your blog get higher income and increase number of page views. We provide you step by step guide to how to add custom popular post widget in blogger. Let’s Start:

How To Add Custom Popular Post Widget In Blogger
There are two part of add custom popular post widget to blogger. Please follow below steps to Add Custom Popular Post Widget In Blogger:
Part 1: Add Popular Post widget in blogger
Step 1
Login into blogger account. Go to Blogger dashboard and click on Layout tab and click on Add a Gadget link as shown in below picture.

Step 2
When you click on Add a Gadget link a popup window will open with all gadgets list. Select popular widget from gadgets list as shown in below picture.

Step 3
Now Customize popular post widget as your requirement as shown in below picture.
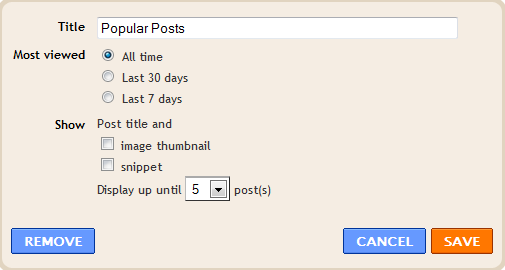
Step 4
Click on save button.
Part 2: Change Popular Post Widget Style
Please follow below steps to add custom style of popular post widget:
Step 1
Now go to Template and click on Edit HTML button as shown in below picture.

Step 2
Search below code with help of CTRL + F:
]]></b:skin>
Step 3
Now choose your style from below images. Copy below code of style and paste it to just before above code:
Style 1
.popular-posts ul{padding-left:0px;} .popular-posts ul li {background: #FFF no-repeat scroll 5px 10px; list-style-type: none; margin:0 0 5px 0px; padding:5px 5px 5px 20px !important; border: 1px solid #dcdcdc; border-radius:10px; -moz-border-radius:10px; -webkit-border-radius:10px; } .popular-posts ul li:hover { background:#FF8040; } .popular-posts ul li a { text-decoration:none; font:14px Georgia, verdana; color:#222222; } .popular-posts ul li a:hover { text-decoration:none; color:#fff; }
Style 2
#PopularPosts1 h2{position:relative;padding:8px 10px 6px 10px;width:100%;margin-bottom: 5px;font-size:17px;color:#757575; /* Color of the widgets title */text-align:left;}#PopularPosts1 ul{list-style:none;counter-reset:li;padding:10px;left:-8px;width:100%;}#PopularPosts1 li{ /* Styles of each element */width:100%;position:relative;left:0;margin:0 0 1px 12px;padding:4px 5px;}#PopularPosts1 ul li:before{content: counter(li);counter-increment: li;position: absolute; left: -30px;top: 50%;margin-top: -13px;background: #8E8E8E; /* background color of the numbers */height: 1.9em;width: 2em;line-height: 2em;text-align: center;font-weight: bold;color: #fff;font-size: 14px;}#PopularPosts1 ul li:after{position: absolute;content: ;left: -2px;margin-top: -.7em; top: 50%;width: 0;height: 0;border-top: 8px solid transparent;border-bottom: 8px solid transparent;border-left:10px solid #8E8E8E; /* background color of the right arrow*/}#PopularPosts1 ul li a{color: #444;text-decoration: none; font-size:15px;}#PopularPosts1 ul li {position: relative;display: block;padding: .4em .4em .4em .8em;*padding: .4em;margin: .5em 0 .5em 0.4em;background: #ddd;transition: all .3s ease-out;text-decoration:none;transition: all .1s ease-in-out;}#PopularPosts1 ul li:hover{background: #eee; /* Background color on mouseover */} #PopularPosts1 ul li a:hover{color:#444; /* Link color on mouseover */margin-left:3px;}
Style 3
.popular-posts ul{padding-left:0px;}
.popular-posts ul li {
list-style-type: none;
margin:0 0 5px 0px;
padding:5px 5px 5px 20px !important;
border: 1px solid #dddddd;
-moz-box-shadow:1px 1px 2px #dcdcdc;
-web-kit-box-shadow: 1px 1px 2px #dcdcdc;
-goog-ms-box-shadow:1px 1px 2px #dcdcdc;
box-shadow:1px 1px 2px #dcdcdc;
border-radius:5px;
background: rgb(44,83,158); /* Old browsers */
background: -moz-linear-gradient(top, rgba(44,83,158,1) 0%, rgba(44,83,158,1) 100%);
/* FF3.6+ */
background: -webkit-gradient(linear, left top, left bottom, color-stop(0%,rgba(44,83,158,1)),
color-stop(100%,rgba(44,83,158,1))); /* Chrome,Safari4+ */
background: -webkit-linear-gradient(top, rgba(44,83,158,1) 0%,rgba(44,83,158,1)
100%); /* Chrome10+,Safari5.1+ */
background: -o-linear-gradient(top, rgba(44,83,158,1) 0%,rgba(44,83,158,1) 100%);
/* Opera 11.10+ */
background: -ms-linear-gradient(top, rgba(44,83,158,1) 0%,rgba(44,83,158,1) 100%);
/* IE10+ */
background: linear-gradient(to bottom, rgba(44,83,158,1) 0%,rgba(44,83,158,1)
100%); /* W3C */
filter: progid:DXImageTransform.Microsoft.gradient( startColorstr=#2c539e,
endColorstr=#2c539e,GradientType=0 ); /* IE6-9 */
}
.popular-posts ul li:hover {
-moz-box-shadow:1px 1px 2px #dcdcdc;
-web-kit-box-shadow: 1px 1px 2px #dcdcdc;
-goog-ms-box-shadow:1px 1px 2px #dcdcdc;
box-shadow:2px 2px 4px #333333;
border:1px solid #333333;
color:#fff;
}
.popular-posts ul li a
{
text-decoration:none;
font:16px Georgia, verdana;
color:#ffffff;
}
.popular-posts ul li a:hover {
text-decoration:none;
}
Style 4
#PopularPosts1 h2{padding:8px 10px 3px 0;width:100%;margin:0;font-size:16px;position:relative;left:-20px;display:block;border-bottom:2px solid #ccc;}#PopularPosts1 ul{list-style:none;counter-reset:li;padding:10px;width:100%;}#PopularPosts1 li{ /* Styles of each element */width:100%;position:relative;left:0;margin:0 0 6px 10px;padding:4px 5px;}#PopularPosts1 ul li:before{ /* Style of the numbers */content:counter(li);counter-increment:li;position:absolute;top:3px;left:-39px;font-size:21px;width:28px;height:28px;border-radius: 50%;color:#777; /* Text color */border: 2px solid #ddd; /* Rounded border color */padding:0;text-indent:9px;}#PopularPosts1 ul li a{display:block;position:relative;left:-45px;width:100%;margin:0;min-height:28px;padding: 5px 3px 3px 39px;color:#333; /* color of the links */text-decoration:none;font-size:14px; /* Font size of the links */font-style: italic;
}#PopularPosts1 ul li a:hover{color:#3366ff;margin-left:3px;}
Style 5
.popular-posts ul { padding-left:0px; -moz-box-shadow:1px 1px 2px #dcdcdc; -web-kit-box-shadow: 1px 1px 2px #dcdcdc; -goog-ms-box-shadow:1px 1px 2px #dcdcdc; box-shadow:1px 1px 2px #dcdcdc; border: 1px solid #dcdcdc; } .popular-posts ul li { list-style-type: none; margin:0 0 5px 0px; padding:5px 5px 5px 20px !important; border-bottom:1px dashed #dcdcdc; background:#ffffff; } .popular-posts ul li a { text-decoration:none; font:16px georgia,verdana; color:#3d87c4; } .popular-posts ul li a:hover { text-decoration:none; color:#333333; }
Step 4
Click on Save button and refresh your blog to see custom popular widget on your blog.
Monday, February 3, 2014
Add Cute Custom Facebook Like Box To Blogger
This tutorial will give you how to Add Cute Custom Facebook Like Box To Blogger with different style. Choose your stylish design for Add facebook like box on your blog. Facebook Like Box is very important social widget to show your facebook fan page likes on your blog. Facebook like Box widget show and increase likes on facebook fan page. You need just copy paste below code into your blog to add this like box and need some small changes to add your page.
How To Add Custom Facebook Like Box to Your Blog
Please follow below steps to add a Custom Facebook like Box to Your blog:
Step 1
Login into your blogger account and go to blogger dashboard. Click on Layout tab at left side in your blogger dashboard and click on Add a Gadget Link. See Below picture for Help.

Step 2
After you click on Add a Gadget link A popup window will open and show you list of available gadget. Choose HTML/JavaScript from the list. See below picture for help.

Step 3
After Select HTML/JavaScript, Add your stylish code from given below:
Note: Replace Haakblog with your Facebook User Name
Style 1:

<div style="background: rgb(255, 123, 73);background: -moz-linear-gradient(90deg, rgb(255, 123, 73) 14%, rgb(232, 129, 116) 69%);background: -webkit-linear-gradient(90deg, rgb(255, 123, 73) 14%, rgb(232, 129, 116) 69%);background: -o-linear gradient(90deg, rgb(255, 123, 73) 14%, rgb(232, 129, 116) 69%);background: -ms-linear-gradient(90deg, rgb(255, 123, 73) 14%, rgb(232, 129, 116) 69%);background: linear-gradient(90deg, rgb(255, 123, 73) 14%, rgb(232, 129, 116) 69%);width:250px;padding:0 0px;margin:10px 0;border:solid 1px #c7c7c7;"><div style="height: 250px; overflow: hidden;"><a href="http://www..com" rel="dofollow" target="_blank" title="Blogger Widget"><img src="https://bitly.com/" alt="Blogger Widget" border="0" style="position: fixed; bottom: 10%; right: 0%; top: 0px;" /></a><iframe src="http://www.facebook.com/plugins/likebox.php?href=http%3A%2F%2Fwww.facebook.com%2F&width=250&height=258&show_faces=true&header=false&stream=false&show_border=false" scrolling="no" frameborder="0" style="border:none; overflow:hidden; width:250px; height:258px;" allowtransparency="true"></iframe></div></div>
<div style="font-family: arial, sans-serif; font-size: 9px;" class="ycdr"><a href="http://www..com/2013/11/add-cute-custom-facebook-like-box-to-blogger.html" target="_blank" title="Like Box Widget">Like Box Widget</a> <a href="http://www..com/" target="_blank">Blogger</a></div>
Style 2:

<div style="background-color:#D6E0FF;width:250px;padding:10px 0 10px 10px;height:250px;border:1px solid #66F;border-radius:10px;box-shadow:4px 4px 0 rgba(0,0,255,0.45);"><div style="height: 250px; overflow: hidden;"><a href="http://www..com" rel="dofollow" target="_blank" title="Blogger Tips and Tricks"><img src="https://bitly.com/" alt="Blogger Tips and Tricks" border="0" style="position: fixed; bottom: 10%; right: 0%; top: 0px;" /></a><a href="http://www..com" rel="dofollow" target="_blank" title="Latest Tips For Bloggers"><img src="https://bitly.com/" alt="Latest Tips For Bloggers" border="0" style="position: fixed; bottom: 10%; right: 0%;" /></a><a href="http://www..com" rel="dofollow" target="_blank" title="Blogger Tricks"><img src="https://bitly.com/" alt="Blogger Tricks" border="0" style="position: fixed; bottom: 10%; left: 0%;" /></a><iframe src="http://www.facebook.com/plugins/likebox.php?href=http%3A%2F%2Fwww.facebook.com%2F&width=250&height=258&show_faces=true&header=false&stream=false&show_border=false" scrolling="no" frameborder="0" style="border:none; overflow:hidden; width:250px; height:258px;" allowTransparency="true"></iframe></div></div><div style="font-family: arial, sans-serif; font-size: 9px;" class="ycdr"><a href="http://www..com/2013/11/add-cute-custom-facebook-like-box-to-blogger.html" target="_blank" title="Like Box Widget">Like Box Widget</a> <a href="http://www..com/" target="_blank">Blogger</a></div>
Style 3:
<div style="background: rgb(0, 255, 0);background: -moz-linear-gradient(90deg, rgb(0, 255, 0) 14%, rgb(249, 228, 175) 69%);background: -webkit-linear-gradient(90deg, rgb(0, 255, 0) 14%, rgb(249, 228, 175) 69%);background: -o-linear gradient(90deg, rgb(0, 255, 0) 14%, rgb(249, 228, 175) 69%);background: -ms-linear-gradient(90deg, rgb(0, 255, 0) 14%, rgb(249, 228, 175) 69%);background: linear-gradient(90deg, rgb(0, 255, 0) 14%, rgb(249, 228, 175) 69%);width:250px;padding:0 0px;margin:10px 0;border:solid 1px #c7c7c7;"><div style="height: 250px; overflow: hidden;"><a href="http://www..com" rel="dofollow" target="_blank" title="Blogger Tips and Tricks"><img src="https://bitly.com/" alt="Blogger Tips and Tricks" border="0" style="position: fixed; bottom: 10%; right: 0%; top: 0px;" /></a><a href="http://www..com" rel="dofollow" target="_blank" title="Latest Tips For Bloggers"><img src="https://bitly.com/" alt="Latest Tips For Bloggers" border="0" style="position: fixed; bottom: 10%; right: 0%;" /></a><a href="http://www..com" rel="dofollow" target="_blank" title="Blogger Tricks"><img src="https://bitly.com/" alt="Blogger Tricks" border="0" style="position: fixed; bottom: 10%; left: 0%;" /></a><iframe src="http://www.facebook.com/plugins/likebox.php?href=http%3A%2F%2Fwww.facebook.com%2FHaakblog&width=250&height=258&show_faces=true&header=false&stream=false&show_border=false" scrolling="no" frameborder="0" style="border:none; overflow:hidden; width:250px; height:258px;" allowTransparency="true"></iframe></div></div><div style="font-family: arial, sans-serif; font-size: 9px;" class="ycdr"><a href="http://www..com/2013/11/add-cute-custom-facebook-like-box-to-blogger.html" target="_blank" title="Like Box Widget">Like Box Widget</a> <a href="http://www..com/" target="_blank">Blogger</a></div>
Style 4:
<div style="background:#f4f4f4;width:250px;padding:0 0px;margin:10px 0;border:solid 6px #e9e8e8;-webkit-border-radius: 10px;-moz-border-radius: 10px;border-radius: 10px;"><div style="height: 250px; overflow: hidden;"><a href="http://www..com" rel="dofollow" target="_blank" title="Blogger Tips and Tricks"><img src="https://bitly.com/" alt="Blogger Tips and Tricks" border="0" style="position: fixed; bottom: 10%; right: 0%; top: 0px;" /></a><a href="http://www..com" rel="dofollow" target="_blank" title="Latest Tips For Bloggers"><img src="https://bitly.com/" alt="Latest Tips For Bloggers" border="0" style="position: fixed; bottom: 10%; right: 0%;" /></a><a href="http://www..com" rel="dofollow" target="_blank" title="Blogger Tricks"><img src="https://bitly.com/" alt="Blogger Tricks" border="0" style="position: fixed; bottom: 10%; left: 0%;" /></a><iframe src="http://www.facebook.com/plugins/likebox.php?href=http%3A%2F%2Fwww.facebook.com%2FHaakblog&width=250&height=258&show_faces=true&header=false&stream=false&show_border=false" scrolling="no" frameborder="0" style="border:none; overflow:hidden; width:250px; height:258px;" allowTransparency="true"></iframe></div></div><div style="font-family: arial, sans-serif; font-size: 9px;" class="ycdr"><a href="http://www..com/2013/11/add-cute-custom-facebook-like-box-to-blogger.html" target="_blank" title="Like Box Widget">Like Box Widget</a> <a href="http://www..com/" target="_blank">Blogger</a></div>
Style 5:
<div style="background: url(https://blogger.googleusercontent.com/img/b/R29vZ2xl/AVvXsEiWjXze1mDw2kQ4WyLCVC6RDDFtuN92db6CbYFrsJ-nJxEln_reWrBAF8aONMXnPbb0hSMHzquRRQ1ndu9ok8nDX8eDwAHLJubz0qd3Yx10LstjCaSV_Mk-fi_pp6YbDGpJszL_McIblXUH/s1600/fan-02-pic.png);overflow:hidden;border-radius: 110px;.height:250px;width: 238px;border-radius: 0px 13px 0px 0px;overflow: hidden;"><div style="height: 250px; overflow: hidden;"><a href="http://www..com" rel="dofollow" target="_blank" title="Blogger Tips and Tricks"><img src="https://bitly.com/" alt="Blogger Tips and Tricks" border="0" style="position: fixed; bottom: 10%; right: 0%; top: 0px;" /></a><a href="http://www..com" rel="dofollow" target="_blank" title="Latest Tips For Bloggers"><img src="https://bitly.com/" alt="Latest Tips For Bloggers" border="0" style="position: fixed; bottom: 10%; right: 0%;" /></a><a href="http://www..com" rel="dofollow" target="_blank" title="Blogger Tricks"><img src="https://bitly.com/" alt="Blogger Tricks" border="0" style="position: fixed; bottom: 10%; left: 0%;" /></a><iframe src="http://www.facebook.com/plugins/likebox.php?href=http%3A%2F%2Fwww.facebook.com%2FHaakblog&width=250&height=258&show_faces=true&header=false&stream=false&show_border=false" scrolling="no" frameborder="0" style="border:none; overflow:hidden; width:250px; height:258px;" allowTransparency="true"></iframe></div></div><div style="font-family: arial, sans-serif; font-size: 9px;" class="ycdr"><a href="http://www..com/2013/11/add-cute-custom-facebook-like-box-to-blogger.html" target="_blank" title="Like Box Widget">Like Box Widget</a> <a href="http://www..com/" target="_blank">Blogger</a></div>
Subscribe to:
Posts (Atom)