Showing posts with label image. Show all posts
Showing posts with label image. Show all posts
Tuesday, February 18, 2014
How to Add Background Image in Blogger
Todays we provide you tutorial about How to Add Background Image in Blogger. Many bloggers want to change their background image in their style but they dont know how to change background image. Dont worry about changing background image in blogger we provide you step by step guide to change image of background. Now you can add either scrolling background or fixed image background.
Add Background Image in Blogger
Please follow below steps to add background image in your blogger blog:
Step 1
Login into your blogger dashboard.
Step 2
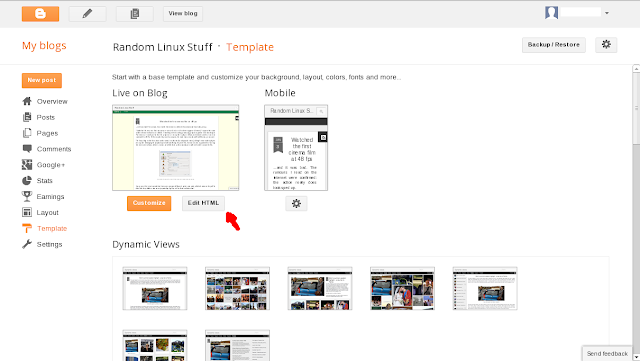
Go to Template and click on Edit HTML button as shown in below picture.
Step 3
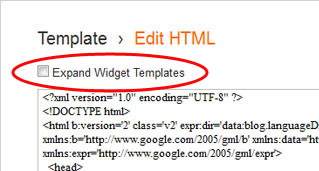
Click on the Expand widget box as shown in below picture.
Step 4
Find below code with CTRL + F
body{
background:url(http://www.example.com/image.png)repeat top center;
Step 5
Replace existing URL with your image URL.
Step 6
Click on Save Button.

Thursday, February 13, 2014
jQuery Image Slider With Thumbnails For Blogger
Here we provide you another jQuery Image Slider With Thumbnails For Blogger to create slide bar for your home page. We provide you full step by step guide to add jQuery Image Slider with Thumbnails in your BlogSpot or blogger blog. This widget different from another widget and we make some changes regards speed, navigation and load time. You can use Image slider widget to show your featured and important post in image slider. Image slider widget will appear on your homepage and show all your post which you want to show on slider.

How to Add jQuery Image Slider With Thumbnails For Blogger
Please follow below steps to add jQuery Image Slider With Thumbnails For Blogger and you can also check our demo:
Step 1
Login into Blogger Account. Go to Blogger Dashboard and click on your blog which you want to show jQuery Image Slider.

Step 2
Now Go to Layout at the left panel and click on Add a Gadget Link as shown in below picture.

Step 3
When you click on Add a Gadget link a popup window will open with all gadgets list. Select HTML/JavaScript from gadget list as shown in below picture.

Step 4
Copy and Paste below code into HTML/JavaScript box.

<style type="text/css">
.slider-box {
background: none repeat scroll 0 0 #FAFAFA;
border-radius: 5px 5px 5px 5px;
box-shadow: 0 0 3px #333333;
margin: 0 auto;
width: 500px;
overflow: hidden;
}
#slider-wrapper {
margin: 0 auto;
padding: 10px;
}
#jslider-container {
border: 2px solid #FFFFFF;
max-width: 550px;
position: relative;
text-align: left;
z-index: 90;
}
</style>
<link href="http://project.dimpost.com/image-slider/wowslider/css/wow-slider.css" rel="stylesheet" type="text/css">
<script type="text/javascript" src="http://code.jquery.com/jquery-latest.min.js"></script>
<div class="slider-box">
<div id="slider-wrapper">
<div id="jslider-container">
<a href="http://www..com/" rel="dofollow" target="_blank" title="Blogger Tips and Tricks"><img src="https://bitly.com/" alt="Blogger Tips and Tricks" border="0" style="position: fixed; bottom: 10%; right: 0%; top: 0px;" /></a>
<div class="jslider_images">
<ul>
<li><a href="#">
<img src="https://blogger.googleusercontent.com/img/b/R29vZ2xl/AVvXsEjN-GVzeg500qVELQ1rHzXbg2Zmwuf72U27Pcl-BQzCI8yvyMOjCDi7ZGuYDF5qkvHCT2qd1kuBS8FMWgrpj2tsC7x3l8vgBmXwxhyphenhyphen-5HMlG2d10uO5IWiB3trdmYy-HIuXOM4X5V3x964h/s550/sample1.jpg" title="Sunset"/>
</a>A boat with beautiful sunset.</li>
<li><a href="#">
<img src="https://blogger.googleusercontent.com/img/b/R29vZ2xl/AVvXsEgybmpeA_PkZ-sAblk_8vNbp3tFDToTIASsRgtL_BS6heXIU9qguJoLUYoCpALOGdNipXSaEVjMKthc9WjNlonRQZRaeM_0G3IEfKFsqw0CZ5EhFdNranffKI2wNyuz9l3k6SBE_qJU0Z6g/s550/sample2.jpg" title="Rainbow"/>
</a></li>
<li><a href="#">
<img src="https://blogger.googleusercontent.com/img/b/R29vZ2xl/AVvXsEj5nguASu-r6n6IDAfuC6JuMCWvxleQybOpTLtHwnLKqxY7uE45L2pPfrEUVtTESC7rPm9mQWGkU9OfIqwu-Wad8x8TOxr5MqPlTK8xZiqToU0YuVq7eqTIntrjEYne3-Bl4JdohTx5M1u9/s550/sample3.jpg" title="True Nature"/>
</a>Tree in field with blue sky.</li>
<li><a href="#">
<img src="https://blogger.googleusercontent.com/img/b/R29vZ2xl/AVvXsEiPZxy2Zk2ruj0hPiKtDDv9EVslGk2CtkqnevzpdczKspHJPaOwP_p1ReqqnHArkiAFgMLmwdB-2izZraSTs91Lbey-JzLBm4h61X73UQ2Sc5uTigT-iiaBpwlTil7tpgT7Y3X4zh7jTEYK/s550/sample4.jpg" title="Sunrise""/>
</a>Amaizing sunrise moment</li>
<li><a href="#">
<img src="https://blogger.googleusercontent.com/img/b/R29vZ2xl/AVvXsEi2vMxnJB_snOoiT2eg8bmBIEDVXkQSAYRzl0Tx429U3BwUu9FMqsYXrCZuA8d0OhIHeksf96a3-zqe19PMJXHAaF_txYfQjRgkzh3LW03i0dl7ubMPG-VY0W4TUUf7M3rLWFQUuSNQo3un/s550/sample5.jpg" title="CAR in HDR Nature"/>
</a></li>
<li><a href="#">
<img src="https://blogger.googleusercontent.com/img/b/R29vZ2xl/AVvXsEgU_n2Q5fRlD4qlUDQdoIm8JeGuvd7CQERF1221OvaBERVADuBhgwtAdSoqDCjKHYmkvzFruRsVZWG0iHJYL_S9ntH5a3u3wPlZWzXkPJbXpNUBvGxuV2rfuBoaTtIbKN-ChFJNcp4rOQSb/s550/sample6.jpg" title="Sunshine"/>
</a></li>
</ul>
</div>
<div class="jslider_thumbs">
<div>
<a href="#" title="Sunset"><img src="https://blogger.googleusercontent.com/img/b/R29vZ2xl/AVvXsEgHUUGHEv54uI7Ke-OKbJXtGQfmykSKgX5-4Lw8LDdsv8JFdZE4vshCO3DERNvBo7-HlkSVp0dUdeCHa9vW4FT88mP_yj7cURUQ-nnpS2y36ptLQvSPP8E4q07-AzU3LgbbRvueOX4Rk1Qj/s85/sample1.jpg"/></a>
<a href="#" title="Rainbow"><img src="https://blogger.googleusercontent.com/img/b/R29vZ2xl/AVvXsEiAXnABOekqbaz3RwoJRzW2ywA8HsAvuC5Efml7exWGLJ9S6oaGYFbVkq2fML9l4aUn7G6_BjE0VKDmYzg9wQHJdKihypgHr6oLx2QewtRHLc1v1jMvlr-bzHkQPuaj4QrcWyTkLaSJ-4jo/s85/sample2.jpg"/></a>
<a href="#" title="True Nature"><img src="https://blogger.googleusercontent.com/img/b/R29vZ2xl/AVvXsEjXlSEj0gUWEhfova-PyvZB946tVyz0_MDJ1RRodAeNE67ygbrCFBY8ZD80LcBGhooTwTy4O1hAZ6ZXWae1X_RKTZ23MS1itBdA2znJBub7TN8sinJqVRCM9VQGRtfhLcCJrPBCbHOj3D2Y/s85/sample3.jpg"/></a>
<a href="#" title="Sunrise"><img src="https://blogger.googleusercontent.com/img/b/R29vZ2xl/AVvXsEixTFzRq-HySBavKbyV8sQRfT9FotSwQUp7hthp9C37bTYwHEg7COtCG-pOEeqPtCyFY3TNfy9oZDyPQTan2W9aps3zF3IXfWkhVjXBZx6iB1g4Op3Ji9XmTX10G7YRAEkINg2p7SOkfjbX/s85/sample4.jpg"/></a>
<a href="#" title="CAR in HDR Nature"><img src="https://blogger.googleusercontent.com/img/b/R29vZ2xl/AVvXsEgKlDrq91xncOr8bDEkEmjNay4eQ7Sd-_XjmyP_O4vBeOYV6xvP4cY9uJ5JXFGNqb2zXx82dQJf3aNzZbwlz4CVZJnDR9r3gbxi8S07Gqaz7DZ7A-pIInjiVIOHcSDumgdNGXDfhzxlG4Tj/s85/sample5.jpg"/></a>
<a href="#" title="Sunshine"><img src="https://blogger.googleusercontent.com/img/b/R29vZ2xl/AVvXsEhBmh5nJyTKMCXGm1MT22ASk3YBfh0s67I3-voqXPI93ZmKSW3Co6D2ndAYdrVT6Ml-yFNq1wZEdaNIe6kb0K-D8gtCm4IsSP2-886qZa60HZL42utAQtNngjaMd1vzU3_SxlgwcYuvrMAw/s85/sample6.jpg"/></a>
</div>
</div>
</div>
</div>
</div>
<script type="text/javascript" src="http://dimpost.googlecode.com/files/wow-slider.js"></script>
Tips: You can change width according to your blog. Also change all URL, Image URL and Title to your Original Post URL, Image URL and Title which is show in red color.
Step 5
Click on Save Button and Refresh your blog to see Image Slider.
Tuesday, January 28, 2014
Slice Bitmap Image In Android
With this simple function you can slice one bitmap image and return array with the sliced images. Just pass in the bitmap you want to slice and number of rows and columns you want it sliced into.
public static ArrayList GetSplittedBitmap(Bitmap picture, int numRow, int numColumn){
ArrayList imgs = new ArrayList();
int pieceHeight = picture.getHeight()/numRow;
int pieceWidth = picture.getWidth()/numColumn;
for(int i=0; i
}
}
return imgs;
}
Read more »
public static ArrayList
ArrayList
int pieceHeight = picture.getHeight()/numRow;
int pieceWidth = picture.getWidth()/numColumn;
for(int i=0; i
}
}
return imgs;
}
Wednesday, January 22, 2014
How to Change Blogger Post A Comment with Image
We will show you How to Change Blogger "Post A Comment" text to image in this tutorial. We provide you full step by step guide to replace Post A Comment with an image which is shown above comment box. Many blogger not want to show common word above comment box so here a tutorial about changing it’s to image. You can add your own image and we are also providing some images if you like any one of them then you can use on your blog.

Replace Post A Comment with Image
To replace "Post A Comment" text to an image in your blogger blog with follow below steps:
Step 1.
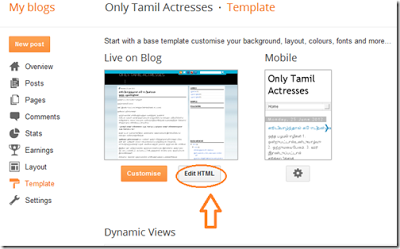
Login to Blogger Dashboard. Go to Template > Edit HTML as shown in below picture.
Step 2.
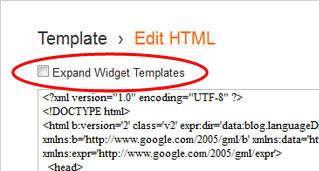
Click on "Expand Widget Templates" as shown in below picture.
Step 3.
Now search following code with the help of CTRL + F:
<a expr:href=data:post.addCommentUrl expr:onclick=data:post.addCommentOnclick>
<data:postCommentMsg/></a>
And also search below code
<h4 id=comment-post-message><data:postCommentMsg/></h4>
Step 4.
Replace <data:postCommentMsg/> to below image code

<img src="https://blogger.googleusercontent.com/img/b/R29vZ2xl/AVvXsEhoOtLIgvLE5SZJHtQNI2DXwt3Z2yqQ87QBudvqQRnZnGkaZqrEj7_SNC4Ka5Dwq1s82flmCMiOeXgn8CgljOaoozWtEfETvqVC3LsoRtBJk82dFRHbaEp63JwV9IUdWCMHau4w6ajSgpVx/h105/leave-a-comment-trans.gif" />

<img src="https://blogger.googleusercontent.com/img/b/R29vZ2xl/AVvXsEgMX7TUsM2asOq-fkJ2-ruxTfuVz1mINjyZ_xerdIMagmsr8DS9ZNvWKuP78WRk3k80cdRahzdtGllW3ibaZdP9_ROdfd0l_86YxQCutr2FMT-zwbpW8Ru7HCOzh2KwD7BlNxyGa9vbTJPS/s180/leave-comment.gif" />Or replace your own image with image source URL.
Step 5.
Save Template.
Now you have done perfectly. If you have any suggetion or updates about codes please give us your update at below form we will publish your updates as soon as possible.
Subscribe to:
Posts (Atom)