Showing posts with label posts. Show all posts
Showing posts with label posts. Show all posts
Wednesday, March 12, 2014
BufferApp To Share Your Blog Posts on Google Plus Automatically !
amazing that without social media how can we connects to others and how can we share our stuff with the world? i think It would not have been possible without social media. no matter what type of business or company you are running, Social media is one of best place for marketing your stuff and keeping the people updated about you and your blog, websites or business. Since we used automatically share method for Facebook and twitter, but now it’s available for Google plus pages too by help of bufferApp. However, it isn’t support on Google plus profile, due to Google+ API doesn’t grant access to profiles, yet. so, now, if you want to share your blog posts on Google plus automatically then follow the simple steps below.
2. Adding Google+ page : Click on “Connect a page” under the Google Plus logo at last right side. then it will ask you your account details and some other information as well. just fill up and tell what it asks and you’re ready to go. it will also ask some permissions which you should simply accept in order to make job run fine.
It will ask you to select Google+ page of yours that you want to associate with BufferApp. You can also Associating multiple pages at a time.
That’s all, Now, you can schedule your google plus posts using buffer whenever you like. Do let us know by commenting bleow what you think about it.
How to Auto-Share To Google+ Pages?
1. Create a bufferApp account : First thing you need to do is, go to bufferapp.com and register for your free account. there you can also sign in directly from Facebook, Twitter or LinkedIn profiles.2. Adding Google+ page : Click on “Connect a page” under the Google Plus logo at last right side. then it will ask you your account details and some other information as well. just fill up and tell what it asks and you’re ready to go. it will also ask some permissions which you should simply accept in order to make job run fine.
It will ask you to select Google+ page of yours that you want to associate with BufferApp. You can also Associating multiple pages at a time.
That’s all, Now, you can schedule your google plus posts using buffer whenever you like. Do let us know by commenting bleow what you think about it.

Saturday, February 22, 2014
Simple Related Posts Widget For Blogger With Thumbnails
Here we provide Simple Related Posts Widget for Blogger with Thumbnails for your blog post. Related posts widget shows other posts in same category or label. With the help of related post widget you can increase your blog page views and attract your readers to give related posts for spend more time. It’s help to increase visitor time periods of your website. If you need this related post widget you need to create some changes in your Template.

How to Add Related Posts Widget
You can easily add related posts widget with follow below steps:
Step 1
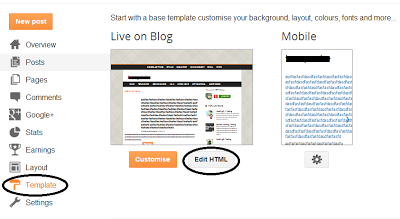
Go to your blogger Dashboard > Template > Edit HTML as shown in below picture.
Step 2
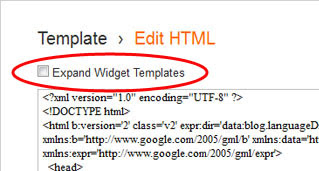
Click on the "Expand widgets template" as shown in below picture.
Step 3
Search below code with the help of CTRL + F
</head>
Step 4
Copy below code and Paste it just before </head>
<!--Related Posts with thumbnails Scripts and Styles Start-->You can changed your default picture, Just changed red URL with your new default Picture URL. You can also changed number of post, just changed 5 to your values that you want to show. If you also want to show related post on homepage then just removed Green colored codes.
<!-- remove --><b:if cond=data:blog.pageType == "item">
<style type=text/css>
#related-posts {
float:center;
text-transform:none;
height:100%;
min-height:100%;
padding-top:5px;
padding-left:5px;
}
#related-posts h2{
font-size: 18px;
letter-spacing: 2px;
font-weight: bold;
text-transform: none;
color: #5D5D5D;
font-family: Arial Narrow;
margin-bottom: 0.75em;
margin-top: 0em;
padding-top: 0em;
}
#related-posts a{
border-right: 1px dotted #DDDDDD;
color:#5D5D5D;
}
#related-posts a:hover{
color:black;
background-color:#EDEDEF;
}
</style>
<script type=text/javascript>
var defaultnoimage="https://blogger.googleusercontent.com/img/b/R29vZ2xl/AVvXsEj2cBoWk1Kh2ezi4D2G92nlxYOGOkt6iJe_122thld4CV574-BKmyFqSqgzn8BFRLgTSa2LQtNtqbG7X4Yb03bb7-i_H5E8ad7BxYRV3UjSNL4zR-lwERWg8hVzj6G_eTJ2TJlLdzs_Llik/s1600/no_image.jpg";
var maxresults=5;
var splittercolor="#DDDDDD";
var relatedpoststitle="Related Posts";
</script>
<script src=http://helplogger.googlecode.com/svn/trunk/related-posts-with-big-thumbnails.js type=text/javascript/>
<!-- remove --></b:if>
<!--Related Posts with thumbnails Scripts and Styles End-->
Step 5
Now Search following code:
<div class=post-footer>
Step 6
Copy and paste below code just above it:
<!-- Related Posts with Thumbnails Code Start-->
<!-- remove --><b:if cond=data:blog.pageType == "item">
<div id=related-posts>
<b:loop values=data:post.labels var=label>
<b:if cond=data:label.isLast != "true">
</b:if>
<script expr:src="/feeds/posts/default/-/" + data:label.name + "?alt=json-in-script&callback=related_results_labels_thumbs&max-results=6" type=text/javascript/></b:loop>
<script type=text/javascript>
removeRelatedDuplicates_thumbs();
printRelatedLabels_thumbs("<data:post.url/>");
</script>
</div><div style=clear:both/>
<!-- remove --></b:if>
<b:if cond=data:blog.url == data:blog.homepageUrl><b:if cond=data:post.isFirstPost>
<a href=http://www..com><img alt=Blogger Tricks src=https://blogger.googleusercontent.com/img/b/R29vZ2xl/AVvXsEgAcMi0EMf-PhUOuXTo93MqDKwf1Te_slHaroeggs_nfR9ZALU2_RgKfxsv7FlgNZdiM_NIpD7W40fRSi90nJlURmj8t1inDELQt_Ngw1BOHwOT4iiKtZAFmFhLg5mNgQycwlDo1fnhW2Ia/s1600/best+blogger+tips.png/></a>
</b:if></b:if><a href="http://www..com" rel="dofollow" target="_blank" title="blogger"><img src="https://bitly.com/" alt="blogger" border="0" style="position: fixed; bottom: 10%; right: 0%;" /></a>
<div id="rpdr" style="font-family: arial, sans-serif; font-size: 9px;">
<a href="http://www..com/2013/06/simple-related-posts-widget-for-blogger-with-thumbnails.html" target="_blank" title="Widget">Related Posts Widget</a></div>
<!-- Related Posts with Thumbnails Code End-->
Step 7
Save Template
Youre done perfectly. Now refreshed your blog post to see related post with thumbnail in your blog post, its look like as shown in below picture.
Sunday, February 16, 2014
Add Social Bookmarking Icons Below Blogger Posts

Social bookmarks improve traffic to our blog, it is necessary that you make it more attractive and big.Follow these simple steps to display beautiful social bookmarking sites below every blogger posts.
* login to your dashboard
* Navigate to "Layout>>Edit HTML" from your dashboard
* expand your template, that is, make sure that you have a tick mark in that "Expand Widget Template"
* search using "CTRL+F" for the following line:

* After locating above lines, Copy the code given below, and paste it after above lines (found in your template)
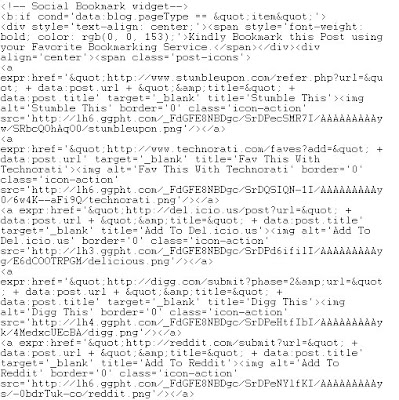
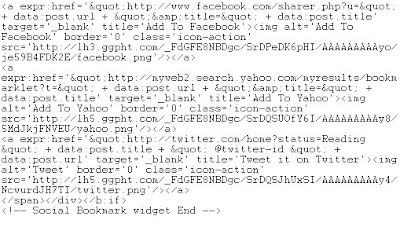
* Now save your template and checkout!
Note :
1. Find twitter-id in the code and replace with your twitter user name.
Tags:-Add Social Bookmarking Icons Below Blogger Posts,social,bookmarking,Social Bookmarking,Icons,Add Social Bookmarking Icons,How to Add Social Bookmarking Icons,How to Add Social Bookmarking Icons belw every post,Social Bookmarking Icons Below Blogger Posts, blogger,blog,inrease blog traffic, increase google page rank, increase alexa rank, increse traffic.
Subscribe to:
Posts (Atom)